Skip to content Skip to main navigation Skip to footer

Log File Compatibility

Forwarding Palo Alto Logs to Cyfin Syslog Server

The following steps are required to forward Palo Alto logs to Cyfin Syslog Server:

  • Create a syslog server profile.
  • Configure a log forwarding profile to select the logs to be forwarded to Cyfin Syslog Server.
  • Assign the log forwarding profile to security rules.

The logs that must be forwarded are the Threat logs with Informational severity. Informational Threat logs include URL Filtering, Data Filtering, and WildFire logs.

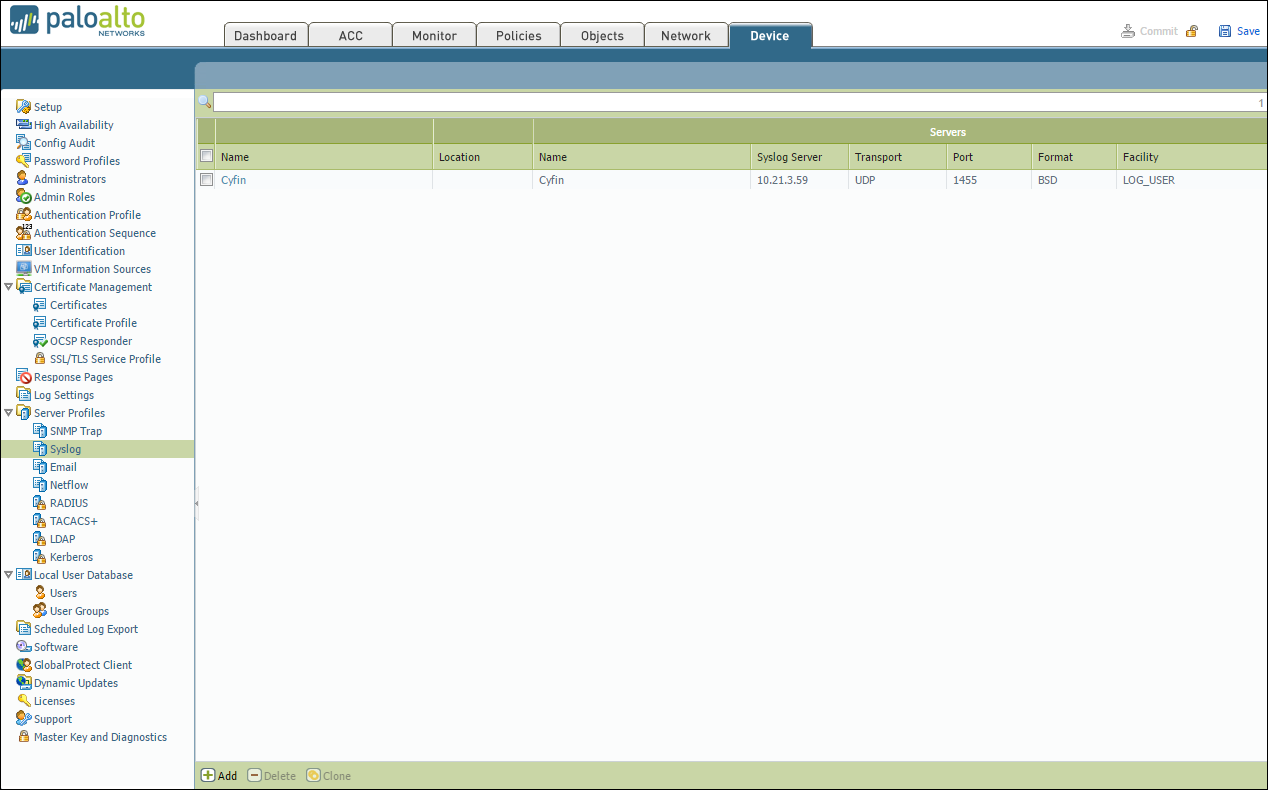
Syslog Server Profile

  1. In your Palo Alto Firewall user interface, go to Device – Server Profiles – Syslog.
  2. Click Add at the bottom of the screen.
  3. Enter the following information:
    • Name – Cyfin
    • Syslog Server – IP address of where Cyfin is installed
    • Transport – UDP
    • Port – 1455
    • Format – BSD
    • Facility – LOG_USER
  4. Click OK to save the server profile.
  5. Click Commit at the top of the screen to commit the change.

serverprofilesmall

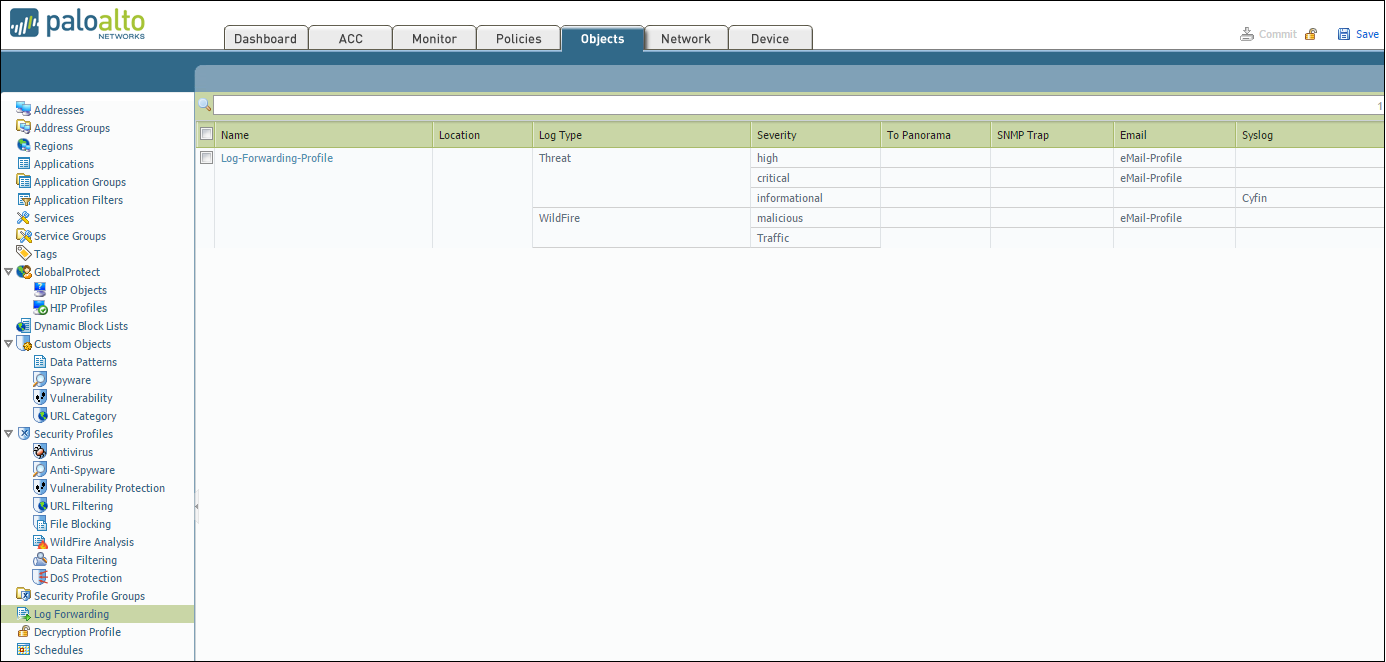
Log Forwarding Profile

  1. Go to Objects – Log Forwarding.
  2. Select the syslog server profile (Log-Forwarding-Profile) for forwarding Threat logs to Cyfin.
  3. In the Threat drop-down field, ensure that for the Severity Informational option, Cyfin is selected in the Syslog column.
  4. To forward URL Filtering logs, add Log Type “URL” and set Severity to “Informational.” Then set Syslog to “Cyfin.”
  5. To forward Traffic logs, add Log Type “Traffic” and set Severity to “Informational.” Then set Syslog to “Cyfin.”
  6. Click Commit at the top of the screen to commit the change.

LogForwardingProfiles

URL Filtering Profile

To log the traffic from URL Filtering logs, you may need to adjust the Site Access for each allowed URL category.

  1. Go to Objects – URL Filtering – URL Filtering Profile.
  2. Select Categories – Site Access.
  3. Filter by “Allow.”
  4. Change “Allow” to “Alert” for each category listed.

Security Policy Rule

  1. Go to Policies – Security.
  2. Select the rule for which the log forwarding needs to be applied.
  3. Apply the security profile to the rule.
  4. Go to Actions and in the Log Forwarding drop-down field, select the log forwarding profile.
  5. Click OK. By default, when Threat logs are forwarded to Cyfin Syslog Server, the logs will have several fields including source IP address, destination IP address, and URL.
  6. Click Commit at the top of the screen to commit the change.

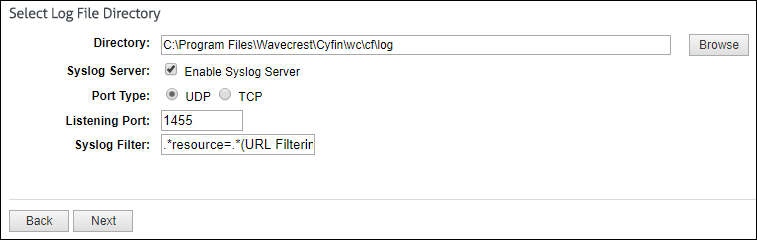
Now, you can configure Cyfin to write the forwarded Palo Alto log files to syslogYYYYXXXX.txt files. See Cyfin Configurations Steps for more information.

Additional Resources:

Configuring SonicWall Web traffic URLs for Cyfin syslog

The following information applies to versions earlier than SonicOS 6.2.6 Content Filtering Service (CFS) release 4.0.

In order to get SonicWall Web traffic URLs into the Cyfin syslog, you must first have the SonicWall Content Filtering Service enabled. You must also enforce the Content Filtering Service within the zone (LAN) in which your traffic will be forwarded. In order to get the service enabled and enforced, follow the steps below:

  1. Log on to your SonicWall interface.
  2. Go to Security Services – Content Filter – Configure.
  3. Select the Log Access to URL box.
  4. Go to Network – Zones. Find the LAN zone and click Configure.
  5. Select the Enforce Content Filtering Service box.
  6. Apply all changes above.

To verify that the changes were made successfully, you can make a copy of the raw syslogs that are generated after the change. These files are in the write location of your Cyfin installation (default location is …Wavecrest\Cyfin\wc\cf\log). You should see files being written called syslogXXXXXXXX.txt, if you have already configured the Cyfin setup correctly.

Make a copy of the most recent file after the change, and use a text editor (Notepad++ works well) to open the file. Search for the fields dstname= and arg= to confirm that they exist. You can use Ctrl+F to find these strings. You may need to wait for a short time after making the changes for them to take effect.

Note:  If the log files are showing as invalid in Cyfin, see Unable to see Web site hits information in SonicWall for a possible resolution.

Additional Resources:

Log file setup for Check Point Syslog in Cyfin

In order to set up Check Point Syslog firewall logs in Cyfin, you must first get the CPLogToSyslog utility. Contact Check Point Support to request the hotfix that contains the utility. If you are running Check Point R77.30, the utility may not be needed. Confirm with Check Point Support. The utility gives Check Point the ability to port the syslog data from the firewall to a specified IP address and port. You will want to forward the “URL filtering” logs from Check Point to the Cyfin syslog server.

Once the CPLogToSyslog utility is installed, Check Point must be configured to have the syslog data pointed to an IP address and port. These will point to the Cyfin server’s IP address and port of choice (default port is UDP 514 for syslog). Once this part is completed in Check Point, you can then open Cyfin, go to Data Management – Log Data Source – Setup, and run through the Log Data Source Setup wizard. Select the Check Point Syslog log file type and the same port you chose in the Check Point setup.

Upon completing the Log Data Source Setup wizard, you should start to see data in the file “SyslogXXXXXXX.txt” in the log file directory that you chose in the wizard.

Using the Cyfin Syslog Server

This information applies to version 9.3.0 and later.

Our Cyfin product allows you to send syslog data to the Cyfin Syslog Server that can then be read by Cyfin. Customers no longer have to install and configure a syslog daemon. You will need to configure your gateway device to direct syslog output to the Cyfin Syslog Server at a configured port.

  1. Go to Data Management – Log Data Source – Setup to create or modify your syslog log file configuration.
  2. Choose from the following:
    • Astaro Security
    • Barracuda Networks
    • Bloxx Proxy
    • Check Point Syslog
    • EdgeWave iPrism
    • FortiGate
    • McAfee Web Gateway Syslog
    • NETGEAR
    • Palo Alto Firewall
    • SonicWall Security Appliance
    • Sophos
    • WatchGuard Syslog
  1. Select Enable Syslog Server, select the port type, and enter a listening port number. The Syslog Filter field is prepopulated with the default value format based on your syslog configuration. It is used to log only the pertinent data into the syslog and not all the data that is being sent.

  1. Once the Cyfin Syslog Server receives data, it will confirm success at parsing the syslog data based on the selected log file type. If there is an issue with the log file validation, your data can be sent to Technical Support for resolution.

For additional assistance, please contact Technical Support at (321) 953-5351, Ext. 4 or support@wavecrest.net.

Additional Resources:

How to change log file database password in Cyfin

If you have recently changed the password for your log file database, you will need to change it in Cyfin as well. There are two ways to do this.

Method One (Report setup wizard)

This information applies to version 9.3.0 and earlier.

  1. In the interface, navigate to Data Management – Log Data Source – Setup¹.
  2. In the Select Configuration drop-down box, choose your current configuration.
  3. Follow the steps, changing only the password when prompted.
Method Two (Direct file edit)
  1. Stop the Cyfin service.
  2. Navigate to …\Wavecrest\Cyfin\wc\cf\db.
  3. Open logfilesManager.xml in an editor (such as WordPad).
  4. Modify the token <set dbpassword=”****”/> with the new password.
  5. Save the file.
  6. Restart the service.


¹ For version 8.8.3a and earlier: Logfiles – Setup