Skip to content Skip to main navigation Skip to footer

Log File Compatibility

Microsoft 365 Reporting Prerequisites

To use Cyfin 365 reporting you need to enable Audit Log Search and register an application in Azure AD.

Once this application is registered note the Application (client) ID and the Directory (tenant) ID. Then configure the authentication in the Certificates & Secrets section from the link provided above.

Configure Cyfin

  1. Navigate to ‘Data Management – Log Data Source – Setup’
  2. Select ‘Create New’ from the configuration dropdown and click ‘Next’
  3. Click Office365 from the listed options
  4. Fill in the appropriate fields with information gathered from the prerequisites. See below image.
  5. Once completed continue to the next screen and name your configuration then click next once more to save.
Microsoft 365 Reporting
Microsoft 365 Cyfin Configuration

Configuring Data Sources

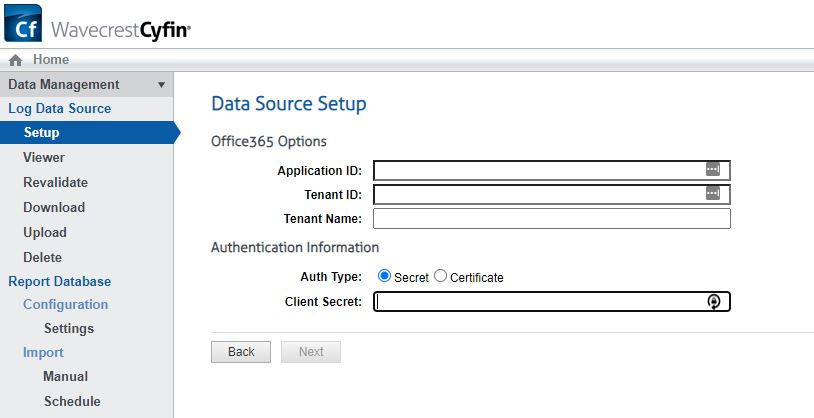
In Cyfin version 9.3.1, the Log Data Source Setup wizard has been redesigned to improve the configuration of the product to locate and read your Web-use data when it is syslog data, log files, or database logs. The system will analyze your data to detect the data source format and present the most suitable data types. This allows you to select the best data type from the list and ensures that you get the best match available.

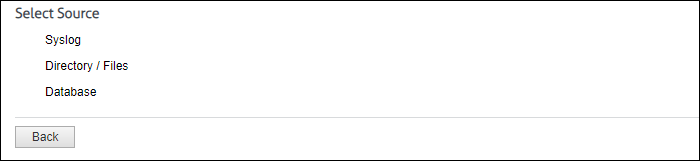
You will be able to select from the following data sources: syslog, directory-based, and database.

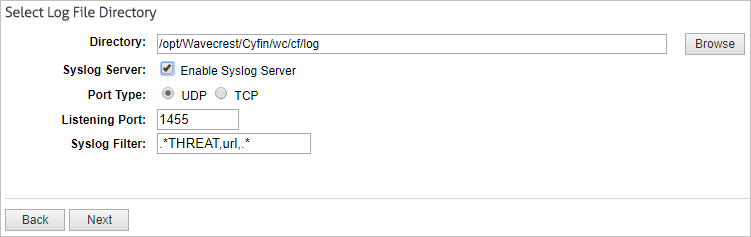
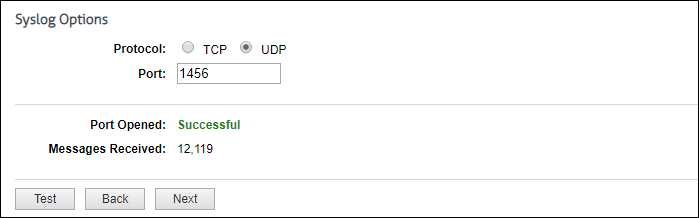
For syslog data, select the Internet protocol you want to use, and enter the listening port number. Click Test to start collecting data. If this is successful, you will see the number of messages received incrementing. Click Stop and then Next to continue.

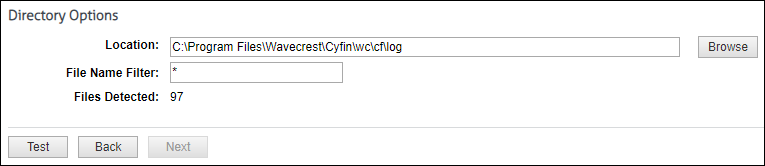
For directory-based or log file data, specify the directory location of your data files. You can also enter a file name with an asterisk to filter your log files, e.g., proxy*.txt. Click Test to display the number of files found. Click Next.

The Data Source Type page is displayed.

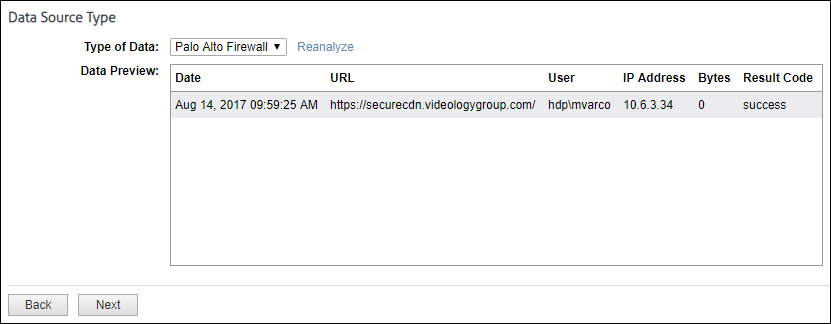
The Type of Data drop-down field will display multiple matches. As you select a data type, the data format will be shown in the Data Preview box. Look closely at the data fields to ensure that they are correct or complete.

  • You may see incomplete data, for example, if you were expecting a user name and it is missing. Click Reanalyze to see another record sample.
  • If you need to refresh the data for any reason or are still in the process of receiving syslog messages, click Reanalyze and then select the data source type again.
  • If your firewall is not in the drop-down field, but the data of another completely matches and is in the correct columns, you may select that firewall even though it has a different name. Some firewalls share common data formats.
  • If no matches are found, all syslog and directory data types will become available in the drop-down field. You can select a different data type from the field to complete the configuration process and return at a later time to change it.
  • It is easy to add new data sources to our extensive library. If you have a new data source, need assistance with multiple matches, or have no matching files, just contact Technical Support.

Also for Syslog, you can specify a location in which to keep a local copy of your data.

For database data, the system loads and populates the Type field with database data types. The “More info” link provides setup information on your specific database. Select the type of database and complete the remaining fields. Some fields will be populated with default values.

The last step is to give the data source configuration a name. This is helpful for identification purposes, especially if you add more data source configurations later.

If you have any questions, please contact Technical Support at (321) 953-5351, Ext. 4 or support@wavecrest.net.

Configuring Zscaler for Cyfin Syslog

Zscaler uses a virtual machine, Nanolog Streaming Service (NSS), to stream logs from the Zscaler service and deliver them to Cyfin Syslog.

To collect logs for Zscaler Web Security, perform these steps detailed in the following sections:

  1. Configure Zscaler NSS.
  2. Connect the Zscaler NSS feed to Cyfin Syslog.


Configure Zscaler NSS

NSS is maintained and distributed by Zscaler as an Open Virtual Application (OVA). To stream logs to Cyfin Syslog, follow the steps outlined in the NSS Configuration Guide at https://support.zscaler.com/hc/en-us…guration-Guide.


Connect the Zscaler NSS Feed to Cyfin Syslog

Once you have configured the Zscaler NSS, now add a feed to send logs to Cyfin Syslog using the following steps.

  1. Log into your Zscaler NSS system.
  2. Go to Administration – Settings – Nanolog Streaming Service.
  3. From the NSS Feeds tab, click Add.
  4. In the Add NSS Feed dialog:
    • Feed Name. Enter a name for your NSS feed.
    • NSS Server. Select None.
    • SIEM IP Address. Enter the Cyfin IP address.
    • Log Type. Select Web Log.
    • Feed Output Type. QRadar LEEF is the default.
    • NSS Type. NSS for Web is the default.
    • Status. Select Enabled.
    • SIEM TCP Port. Enter the Cyfin Syslog TCP port number.
    • Feed Escape Character. Leave this field blank.
    • Feed Output Format. The LEEF format is displayed.
    • User Obfuscation. Select Disabled.
    • Duplicate Logs. Disabled by default.
    • Timezone. Set to GMT by default.
  5. Click Save.

Additional Resources

Configuring Cisco Firepower logs for Cyfin Syslog

The following steps pertain to Cisco Firepower Threat Defense and are required to forward these logs to Cyfin Syslog Server:

  1. Select Devices – Platform Settings and create or edit a Firepower Threat Defense policy.
  2. Select Syslog – Syslog Server.
  3. Check the Allow user traffic to pass when TCP syslog server is down check box to allow traffic if any syslog server that is using the TCP protocol is down.
  4. Enter a size of the queue for storing syslog messages on the security appliance when syslog server is busy in the Message queue size (messages) field. The minimum is 1 message. The default is 512. Specify 0 to allow an unlimited number of messages to be queued (subject to available block memory).
  5. Click Add to add a new syslog server.
    • In the IP Address drop-down list, select a network host object that contains the IP address of the syslog server.
    • Choose the protocol (either TCP or UDP) and enter the port number for communications between the Firepower Threat Defense device and Cyfin syslog server.
    • The default ports are 514 for UDP and 1470 for TCP. Valid nondefault port values for either protocol are 1025 through 65535.
    • Check the Log messages in Cisco EMBLEM format (UDP only) check box to specify whether to log messages in Cisco EMBLEM format (available only if UDP is selected as the protocol).
    • Add the zones that contain the interfaces used to communicate with the syslog server. For interfaces not in a zone, you can type the interface name into the field below the Selected Zones/Interface list and click Add. These rules will be applied to a device only if the device includes the selected interfaces or zones.

    Note:  If the syslog server is on the network attached to the physical Management interface, you must type the name of that interface into the Interface Name field below the Selected Security Zones list and click Add. You must also configure this name (if not already configured), and an IP address, for the Diagnostic interface (edit the device from the Device Management page and select the Interfaces tab).

    • Click OK.
  1. Click Save.

You can now click Deploy and deploy the policy to assigned devices. The changes are not active until you deploy them.

Click here for more information from Cisco.

Additional Resources

Check Point Log Exporter

If you are running Check Point R77.30 or later, you must first use Check Point Log Exporter for exporting Check Point logs over syslog to Cyfin. Click here for the instructions from Check Point Support.

Important Notes

Commands should be run in an SSH session switched to Expert mode.

Installation

Ensure that the Log Exporter is installed on a log server for Check Point R77.30 and R80.10. Log Exporter is already integrated in R80.20.

Basic Deployment

In order to configure a Cyfin target for the logs, run the following on the log server:

cp_log_export add name cyfin_syslog target-server <cyfin_ip> target-port 1455 protocol udp format syslog –apply-now

where <cyfin_ip> is the IP address of your Cyfin server

Helpful Tools

  • To remove the exporter, run:

cp_log_export delete name cyfin_syslog –apply-now

  • To display the exporter’s status, run:

cp_log_export status name cyfin_syslog

  • To reset the current position and reexport all logs per the configuration, run:

cp_log_export reexport name cyfin_syslog

Troubleshooting Tips

If you do not see log files being exported:

  • Stop the exporter by running: cpstop
  • Then start the exporter by running: cpstart

If there is still an issue:

  • Edit $EXPORTERDIR/targets/cyfin_syslog/targetConfiguration.xml
  • Locate <log_files>1</log_files>
  • Change to <log_files></log_files>
  • Stop the exporter by running: cpstop
  • Then start the exporter by running: cpstart

Once this part is completed in Check Point, you can then open Cyfin, go to Data Management – Log Data Source – Setup, and run through the Log Data Source Setup wizard. Upon completing the Log Data Source Setup wizard, you should start to see data in the file “SyslogXXXXXXX.txt” in the log file directory that you chose in the wizard.

Additional Resources:

Cyfin VM syslog port

In Cyfin VM, when configuring the Cyfin Syslog Server port, the port number must be greater than 1000. Port numbers 1000 and below are blocked on the VM. Follow the steps below to change the port number if it is below 1000.

The steps below apply to version 9.3.0. However, follow the same guidelines for version 9.3.1 and later.

  1. In Cyfin VM, go to Data Management – Log Data Source – Setup.
  2. Select your existing syslog log file configuration and click Next.
  3. On the Modify confirmation screen, select the check box to indicate that you understand the statements on the screen. Click Next.
  4. On the Select Log File Type screen, your log file type is already selected. Click Next.
  5. If an Information screen appears, click Next.

  1. On the Select Log File Directory screen, change the number in the Listening Port field to one that is greater than 1000. Click Next.
  2. Click Next on the following screens to complete the validation process.

Note: Steps for v943 and older are shown in video below

Additional Resources:

Unable to see Web site hits information in SonicWall

In SonicWall, if the Content Filtering Service (CFS) is enabled, but the log file is not receiving Web traffic data and therefore not showing as valid in Cyfin, then you need to check the Priority setting for “Syslog Website Accessed.”

  1. Go to Log – Settings and set the Logging Level field to “Inform.”

  1. Then under Category, go to Log – Syslog – Syslog Website Accessed.

  1. Adjust the priority to match the selected logging level.

  1. The log file should now receive Web traffic data and show as valid in Cyfin.

What are the log file fields needed by Cyfin?

Cyfin needs certain log file fields to process your logs. The following log file fields are required:

  • Date/Time
  • URL – If the file contains the protocol, domain/host name, and path separately, the URL can be created from these fields.
  • IP Address

In addition, the following optional fields are optimal for more detailed reporting:

  • User
  • Size/Bytes
  • Reason/Status

If you have any questions, please contact Technical Support at (321) 953-5351, Ext. 4 or support@wavecrest.net.

Configuring Sophos UTM for Cyfin syslog

In order for Cyfin to analyze the Sophos UTM firewall data, you must perform the following steps to produce the proper syslog data:

  1. Set up the Web filtering option.
    • To set up the Web filtering functionality on the Web server, go to Web Protection – Web Filtering – Global and click the enable button.
  2. Syslog settings are configured in WebAdmin on the Logging & Reporting – Log Settings – Remote Syslog Server tab.
    • On this tab, multiple target syslog servers may be added, and logs may be sent to any TCP or UDP port. (Most systems will default to UDP port 514.)
    • If syslog messages cannot be delivered, they will be buffered and re-sent when possible.
    • By default, up to 1000 logs will be buffered. This feature is most reliable when using TCP as it will detect when message deliveries fail more accurately.
    • When using UDP, a failure will only be detected if the target IP is online and able to respond with an ICMP (Internet Control Message Protocol) service unavailable message.
  3. Once syslog targets have been configured, the logs to send via syslog must also be selected on the same screen. By default, none are selected. Select the Web Filter log file type, and click Apply.

Now you can proceed to configure Cyfin to receive these syslog data records.

Additional Resources:

Selecting WatchGuard log file configurations in Cyfin

Syslog Configuration

In Cyfin, the following WatchGuard syslog log file configurations are available:

  • WatchGuard Syslog
  • WatchGuard Syslog (HTTP)
  • WatchGuard Syslog (HTTPS – Bytes)
  • WatchGuard Syslog (HTTPS)

WatchGuard supports byte information for HTTP as well as HTTPS traffic. To assist you in selecting the appropriate syslog log file configuration, determine what you need from the following:

  • For all Web traffic with no byte information, configure WatchGuard Syslog.
  • For a complete picture of your Web traffic, configure WatchGuard Syslog (HTTP), WatchGuard Syslog (HTTPS – Bytes), and WatchGuard Syslog (HTTPS).

Cyfin can be set to receive syslog data from your different WatchGuard devices. Each different device would have its own log file configuration.

Cyfin Syslog Server listens for syslog messages from your WatchGuard device. Both UDP-based and TCP-based messages are supported.

  1. Select the WatchGuard Syslog log file configuration in Cyfin for your WatchGuard device.
  2. Specify the Directory in which the log files will be created. The default directory is [InstallPath]\wc\cf\log. NOTE:  For WatchGuard Syslog (HTTPS – Bytes), and WatchGuard Syslog (HTTPS), this is all that is needed.
  3. For WatchGuard Syslog and WatchGuard Syslog (HTTP), select Enable Syslog Server.
  4. For Port Type, select UDP or TCP for the Internet protocol you want to use.
  5. In the Listening Port field, the default port number is 1455. The listening port will be used by your WatchGuard device to transfer the data. You may change this number if necessary.
  6. At your WatchGuard device, specify the IP address of the Cyfin server and the listening port, and submit the syslog messages.
  7. Your log files will be created and displayed in the Log File Viewer in Cyfin.
  8. If you have many of the same WatchGuard devices, use one log file configuration with one listening port, and point each WatchGuard device to the same listening port.

Database Configuration

The WatchGuard PostgreSQL database configuration is also available.

We recommend that you install Cyfin on the same box with the WatchGuard Log Server (PostgreSQL) for easier configuration and speed. Your PostgreSQL database should also be an external database in order for Cyfin to read the log files. Note that Cyfin cannot read data from a database configured in WatchGuard Dimension.

Before trying to connect Cyfin to your WatchGuard Log Server, make sure you have selected to Send logs to WSM Server on the WatchGuard Logging page.

You will need the following information to connect Cyfin to the WatchGuard Log Server PostgreSQL logs:

  • Server Name
  • Database
  • Port
  • User Name
  • Password