Skip to content Skip to main navigation Skip to footer

Blog

How to set up a captive portal

For CyBlock customers, captive portal is available as an alternative to NTLM authentication in CyBlock Software, CyBlock Appliance, and CyBlock Cloud (version 9.1.0). Captive portal requires an account for each user who wants to access the Internet through your network. When a user tries to access a Web site, a browser cookie authentication logon page is displayed that will allow users to create an account or reset their password if forgotten. When entering their credentials, you can require users to agree to the company’s AUP before continuing on.

The steps to set up a captive portal are highlighted below. Be sure to check out the product Help or manual for detailed instructions.

  1. Set up your rules for proxy authentication. Go to User Management – Authentication.

userManagementAuthenticationRules

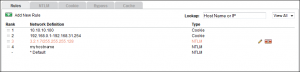
Note:  The Bypass and Cache tabs are available in CyBlock Software and CyBlock Appliance only.

  1. Define how long the cookie will persist, and specify and preview the details of your cookie authentication logon page. Go to User Management – Authentication and click the Cookie tab.

userManagementAuthenticationCookie

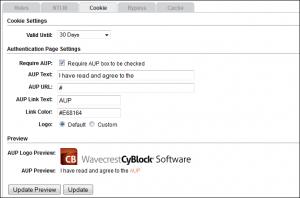
Note:  In CyBlock Appliance and CyBlock Cloud, this tab will be displayed differently.

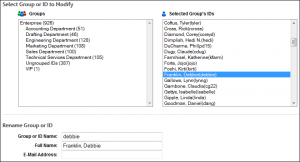
  1. Ensure that users have an e-mail address entered in Groups and IDs. Go to User Management – Edit Users – Modify.

userManagementEditUsersModify

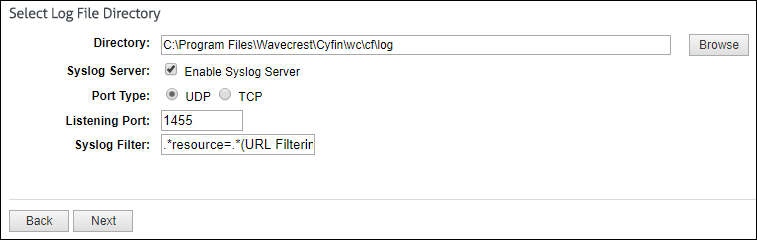
  1. Set up users’ browsers to allow local addresses to go through the proxy, that is, to not bypass the proxy server.
    • In Internet Explorer, go to Tools – Internet options and click the Connections tab.
    • Click LAN settings.
    • Under Proxy server, ensure that the “Bypass proxy server for local addresses” check box is not selected.
  2. Access a Web site, and the cookie authentication logon page will appear allowing you to create an account.
  3. After creating your account, enter your new password, and you will be redirected to the Web site that you were trying to access.

For additional assistance, please contact Technical Support at (321) 953-5351, Ext. 4 or support@wavecrest.net.

Using the Cyfin Syslog Server

This information applies to version 9.3.0 and later.

Our Cyfin product allows you to send syslog data to the Cyfin Syslog Server that can then be read by Cyfin. Customers no longer have to install and configure a syslog daemon. You will need to configure your gateway device to direct syslog output to the Cyfin Syslog Server at a configured port.

  1. Go to Data Management – Log Data Source – Setup to create or modify your syslog log file configuration.
  2. Choose from the following:
    • Astaro Security
    • Barracuda Networks
    • Bloxx Proxy
    • Check Point Syslog
    • EdgeWave iPrism
    • FortiGate
    • McAfee Web Gateway Syslog
    • NETGEAR
    • Palo Alto Firewall
    • SonicWall Security Appliance
    • Sophos
    • WatchGuard Syslog
  1. Select Enable Syslog Server, select the port type, and enter a listening port number. The Syslog Filter field is prepopulated with the default value format based on your syslog configuration. It is used to log only the pertinent data into the syslog and not all the data that is being sent.

  1. Once the Cyfin Syslog Server receives data, it will confirm success at parsing the syslog data based on the selected log file type. If there is an issue with the log file validation, your data can be sent to Technical Support for resolution.

For additional assistance, please contact Technical Support at (321) 953-5351, Ext. 4 or support@wavecrest.net.

Additional Resources:

Activating Cyfin Proxy

These instructions are for renewing Cyfin Proxy customers.

  1. Log on to Cyfin Proxy.
  2. Go to Setup – License.
  3. In the Serial Number field, enter the number found in the Cyfin Subscription Activation Key Certificate in your e-mail.
  4. In the Activation Key field, enter the Activation Key also found in the Certificate.
  5. Click the Submit button to save the changes.

Activating CyBlock ISA/TMG

These instructions are for new and renewing CyBlock ISA/TMG customers.

  1. For new customers: To activate CyBlock ISA/TMG, you have two options to get started:
    • Log on to your CyBlock ISA/TMG evaluation copy.
    • Install a new version of CyBlock ISA/TMG (if you want the product located on a different server) and log on using the default logon and password listed below.
      • Logon – admin
      • Password – password
  2. For renewing customers: Log on to CyBlock ISA/TMG.
  3. Go to Setup – License.
  4. In the Serial Number field, enter the number found in the CyBlock Subscription Activation Key Certificate in your e-mail.
  5. In the Activation Key field, enter the Activation Key also found in the Certificate.
  6. Click the Submit button to save the changes.

Downloading the product

Follow these instructions to check for new product versions and download the latest release.

  1. Go to the product update screen.
    • For CyBlock/Cyfin 9.0.5 and later: Go to Help – Check for Updates.
    • For CyBlock 6.8.3a/Cyfin 8.8.3a and earlier: Go to Administration – Product Update.
  2. The Status message will let you know if there are any new updates or if your product is currently up to date.
  3. If updates are available:
    • For CyBlock/Cyfin 9.0.5 and later: Click Update Now to upgrade the product.
    • For CyBlock 6.8.3a/Cyfin 8.8.3a and earlier: Click Download Now to upgrade the product.

Participating in OtherWise

We invite you to participate in our OtherWise service to help you reduce the number of uncategorized sites (that is, sites categorized as “Other”). OtherWise is a voluntary and confidential program in which we help you improve the quality and usability of your reports. To participate in OtherWise, simply follow the below steps.

  1. Go to the OtherWise screen.
    • For CyBlock/Cyfin 9.0.5 and later: Go to Settings – Reports – OtherWise.
    • For CyBlock 6.8.3a/Cyfin 8.8.3a and earlier: Go to Setup – Otherwise.
  2. Select the Enable option.
  3. Select the day of the week and hour of the day that you want the data to run.
  4. Click Submit to save your changes, and the data will now be e-mailed automatically to our site analysts at Wavecrest.

Visit our Web site to learn more about our OtherWise program.

Activating Cyfin

These instructions are for new and renewing Cyfin customers.

  1. For new customers: To activate Cyfin, you have two options to get started:
    • Log on to your Cyfin evaluation copy.
    • Install a new version of Cyfin (if you want the product located on a different machine) and log on using the default logon and password listed below.
      • Logon – admin
      • Password – password
        For Cyfin versions 9.0.5 and later: You will be required to change your password. After changing your temporary password, log on with your new password.
  2. For renewing customers: Log on to Cyfin.
  3. Go to the License Information screen.
    • For Cyfin versions 9.0.5 and later: Go to Settings – License.
    • For Cyfin versions 6.8.3a and earlier: Go to Setup – License.
  4. In the Serial Number field, enter the number found in the Cyfin Subscription Activation Key Certificate in your e-mail.
  5. In the Activation Key field, enter the Activation Key also found in the Certificate.
  6. Click the Submit button to save the changes.

Activating Cyfin (for CyBlock Appliance customers)

These instructions are for CyBlock Appliance customers that are evaluating or purchasing CyBlock Appliance and want to use Cyfin for remote logging and reporting.

The serial number and activation key that were included with your CyBlock Appliance need to be entered in the Cyfin interface. Please see the product manual for further setup instructions. The product manual is located on our Web site at Support – CyBlock Appliance – Documentation and in your product:

  • For CyBlock versions 9.0.5 and later: Go to Help – User Guide.
  • For CyBlock versions 6.8.3a and earlier: Go to Help – Documentation.
  1. Download Cyfin from our Web site.
  2. Double-click the executable file and simply follow the wizard’s onscreen instructions.
  3. Log on to the product using the following default credentials:
    • Logon – admin
    • Password – password
      For CyBlock versions 9.0.5 and later: You will be required to change your password. After changing your temporary password, log on with your new password.
  4. When you log on to Cyfin, you will see a message that Download Settings need to be confirmed and/or that there is no URL List. Before doing anything else, you must first download the URL List.
  5. To download the list:
    • For CyBlock versions 9.0.5 and later: Go to Categorization – URL List – Download and select Manual.
    • For CyBlock versions 6.8.3a and earlier: Go to Administration – URL List and click the Manual link.
  6. Next, click on the Download Now button. You should see a progress meter screen pop up. When it indicates that the download is complete, you can close the window.
  7. You now need to enter your serial number and activation key.
    • For CyBlock versions 9.0.5 and later: Go to Settings – License.
    • For CyBlock versions 6.8.3a and earlier: Go to Setup – License.
  8. You may enter the Organization Name and Server Alias Name. These are optional.
  9. Enter the Serial Number and Activation Key that were included with your appliance.
  10. Click Submit to save your changes.
  11. Please see the product manual for further setup instructions.

For additional assistance, please contact Technical Support at (321) 953-5351, Ext. 4 or support@wavecrest.net.

Activating CyBlock Appliance and Cyfin

These instructions are for CyBlock Appliance customers that are renewing CyBlock Appliance or purchasing after evaluation.

The serial number and activation key need to be entered in both the CyBlock Appliance and Cyfin interfaces. Please see the product manual for further setup instructions. The product manual is located on our Web site at Support – CyBlock Appliance – Documentation and in your product:

  • For CyBlock/Cyfin 9.0.5 and later: Go to Help – User Guide.
  • For CyBlock 6.8.3a/Cyfin 8.8.3a and earlier: Go to Help – Documentation.
  1. Log on to CyBlock Appliance.
  2. Go to the License Information screen.
    • For CyBlock/Cyfin 9.0.5 and later: Go to Settings – License.
    • For CyBlock 6.8.3a/Cyfin 8.8.3a and earlier: Go to Setup – License.
  3. You may enter the Organization Name and Server Alias Name. These are optional.
  4. Enter the Serial Number and Activation Key that were included with your appliance.
  5. Click Submit to save your changes.
  6. Repeat the above steps in Cyfin.
  7. Please see the product manual for further setup instructions.

For additional assistance, please contact Technical Support at (321) 953-5351, Ext. 4 or support@wavecrest.net.

Activating CyBlock Software

These instructions are for new and renewing CyBlock Software customers.

  1. For new customers: To activate CyBlock Software, you have two options to get started:
    • Log on to your CyBlock Software evaluation copy.
    • Install a new version of CyBlock Software (if you want the product located on a different server) and log on using the default logon and password listed below.
      • Logon – admin
      • Password – password
        For CyBlock versions 9.0.5 and later: You will be required to change your password. After changing your temporary password, log on with your new password.
  2. For renewing customers: Log on to CyBlock Software.
  3. Go to the License Information screen.
    • For CyBlock versions 9.0.5 and later: Go to Settings – License.
    • For CyBlock versions 6.8.3a and earlier: Go to Setup – License.
  4. In the Serial Number field, enter the number found in the CyBlock Subscription Activation Key Certificate in your e-mail.
  5. In the Activation Key field, enter the Activation Key also found in the Certificate.
  6. Click the Submit button to save the changes.