Skip to content Skip to main navigation Skip to footer

Blog

Converting older scheduled reports to the new UI

This applies to CyBlock Software and Cyfin.

When upgrading an older version 6.x.x/8.x.x of the product to the newer version 9.x.x, scheduled reports may not convert to the new user interface in some cases. Customers should send their …\wc\[cf|cyblock]\db\sched folder to Technical Support.

To upgrade to the latest version, please contact Technical Support at (321) 953-5351, Ext. 4 or support@wavecrest.net.

What is CyBlock Directory Agent?

For CyBlock Cloud customers, CyBlock Directory Agent is a directory synchronization tool that bridges the gap between your internal Active Directory (AD) and CyBlock Cloud service. It updates the user information required by the cloud service keeping the cloud service in sync with the local AD.

The highlights of how the Directory Agent works are as follows:

  • A CyBlock Cloud account is created for you with the Directory Agent module enabled.
  • You will receive an e-mail notification to complete your registration by logging on to the interface.
  • You install the Directory Agent on an appropriate computer that has internal network access to AD
    and external network access to the cloud service.
  • Once the Directory Agent is installed, you pair the installation with your cloud account.
  • You create an AD configuration to link to your internal AD. Multiple AD configurations may be created.
  • You import users and groups from AD manually or schedule a daily import.
  • The imported users and groups are synced with the cloud service.
  • You can view the imported users and groups to verify the grouping structure.
  • When AD configuration changes occur, they automatically sync with the cloud service.

Setting the character set for MySQL

The following instructions apply to CyBlock Software and Cyfin version 9.2.8 and later.

When creating a MySQL database from the Data Management – Report Database – Configuration – Settings screen, set the proper character set using the command-line MySQL client.

On the Required Database Setup page, for Option A, step 3, the command is “CREATE DATABASE superview CHARACTER SET latin1.”

Note:  Development of MySQL Query Browser has been discontinued, but MySQL Workbench is available.

How to exclude Web sites from reports with custom categories

This information applies to version 9.x.x.

There are times when you want to exclude Web sites from reports due to either their known traffic or any other reason. The following steps will accomplish this task:

  1. Create a custom category on the Categorization – Customize – URLs screen.
  2. Turn off the “Display Categories” setting for this new category on the Categorization – Customize – Categories screen.
  3. If you wish to exclude the category from past reporting, you must delete and reimport the Report Database data. Otherwise, only URLs from this point forward will be excluded. This process happens at the time of import.


Windows Update through the proxy

If updates fail to run through the proxy, you will need to manually set proxy settings for Windows Update. Additionally, it may be necessary to bypass authentication for certain URLs in order for the updates to pass.

Setting Proxy Configuration for Windows Updates

  1. You can import proxy settings from Internet Explorer by opening a command prompt and entering the following:
    • netsh winhttp import proxy
  2. Additionally, you can manually set the proxy by opening a command prompt and entering the following:
    • netsh winhttp set proxy <Proxy Server>:<Port> “<Exclusion List>”

Bypassing Authentication for Windows Updates

  1. In the CyBlock interface, go to User Management – Authentication and click the Bypass tab.
  2. Add new bypass entries by clicking the green green button button.
  3. Create two separate entries using the following configurations (with asterisks as wildcards).
    • URL or Domain: *.microsoft.com             |  User-Agent: *
    • URL or Domain: *.windowsupdate.com   |  User-Agent: *

Users prompted to enter credentials when accessing specific sites

To stop users from receiving authentication prompts for specific sites, you can bypass authentication for these sites in the Authentication Manager.

  1. In the interface, go to User Management – Authentication and click the Bypass tab.
  2. Click the green green button button to add a new bypass entry.
  3. Enter the URL in question. You can use asterisks (*) as wildcards.
  4. For User-Agent, enter an asterisk (*).
  5. Click Add.


A previously working internal site is now unreachable

This may be a DNS issue. CyBlock keeps DNS information for 24 hours before refreshing its cache. If the name or IP of the site has changed within the last 24 hours, users may not be able to reach the page until the cache refreshes.

If this is the case, the immediate solution would be to restart the CyBlock service, which will cause the cache to refresh.

Web site not loading correctly through the proxy

When going through the proxy, a user may experience issues with a Web page loading incorrectly. The problems may manifest in various ways, such as:

  • The page is blank.
  • The page shows multiple red x’s throughout.
  • The page is improperly formatted and mostly (or only) text.

Below are two methods to try to get the page to appear properly.

  1. Embedded content may be blocked by the Banners and Ads category.
    • Unblock the Banners and Ads category and refresh the browser.
  2. The Web site has been explicitly allowed, but content delivery domains (CDNs) are still being blocked.
    • To determine if a content domain is being blocked, use the Real-Time Monitor (RTM).
    • In the CyBlock interface, go to Real-Time Monitors – Web.
    • Remove “Enterprise” from the Groups field. In the IDs field, add only the user who will be testing the Web page.
    • Click Start Monitor.
    • Attempt to reload the page and watch the RTM for any URLs that appear in red.
    • Add these URLs to an allowed category (Categorization – Customize – URLs).
    • Reload the page.

If the above options do not fix the issue, please contact Technical Support at (321) 953-5351, Ext.4 or support@wavecrest.net.


Using the audit report filters

In audit detail reports, report filters allow you to filter data by user, IP address, category, search term, and URL. The filters are located in the Audit Detail section of the report. If only one user or one category exists in the report, the corresponding filter field will not be displayed. For example, a Category Audit Detail report provides data on one category at a time, and therefore, the category filter field will not be displayed.

The following reports contain filters:

  • Category Audit Detail
  • Denied Detail
  • Legal Liability Detail
  • Search Terms Audit Detail
  • Site Audit Detail
  • User Audit Detail

The following filters are available depending on the report:

  • The user filter field shows all users in the report. When you make a selection, the report shows only data for that user.
    • In the User Audit Detail report, this field shows IP addresses. If there is only one IP address associated with the user, the filter field will not show.
  • The category filter field shows all categories in the report. When you make a selection, the report shows only data for that category.
  • A text field lets you enter URL text to filter on. You do not have to type the full URL. The report shows only data with URLs containing the entered text.
    • In the Search Terms Audit Detail report, you would enter a search term or search term phrase to filter on. The report shows only data with the entered search term or search term phrase.

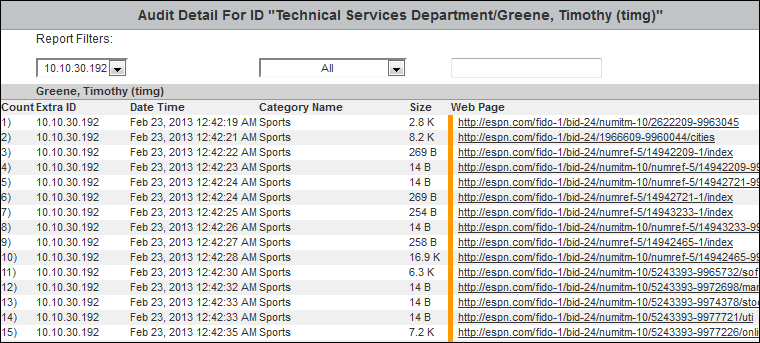
Below is an example of a User Audit Detail report.

For additional assistance, please contact Technical Support at (321) 953-5351, Ext. 4 or support@wavecrest.net.