Skip to content Skip to main navigation Skip to footer

Administration

Participating in OtherWise

We invite you to participate in our OtherWise service to help you reduce the number of uncategorized sites (that is, sites categorized as “Other”). OtherWise is a voluntary and confidential program in which we help you improve the quality and usability of your reports. To participate in OtherWise, simply follow the below steps.

  1. Go to the OtherWise screen.
    • For CyBlock/Cyfin 9.0.5 and later: Go to Settings – Reports – OtherWise.
    • For CyBlock 6.8.3a/Cyfin 8.8.3a and earlier: Go to Setup – Otherwise.
  2. Select the Enable option.
  3. Select the day of the week and hour of the day that you want the data to run.
  4. Click Submit to save your changes, and the data will now be e-mailed automatically to our site analysts at Wavecrest.

Visit our Web site to learn more about our OtherWise program.

Activating Cyfin

These instructions are for new and renewing Cyfin customers.

  1. For new customers: To activate Cyfin, you have two options to get started:
    • Log on to your Cyfin evaluation copy.
    • Install a new version of Cyfin (if you want the product located on a different machine) and log on using the default logon and password listed below.
      • Logon – admin
      • Password – password
        For Cyfin versions 9.0.5 and later: You will be required to change your password. After changing your temporary password, log on with your new password.
  2. For renewing customers: Log on to Cyfin.
  3. Go to the License Information screen.
    • For Cyfin versions 9.0.5 and later: Go to Settings – License.
    • For Cyfin versions 6.8.3a and earlier: Go to Setup – License.
  4. In the Serial Number field, enter the number found in the Cyfin Subscription Activation Key Certificate in your e-mail.
  5. In the Activation Key field, enter the Activation Key also found in the Certificate.
  6. Click the Submit button to save the changes.

Activating Cyfin (for CyBlock Appliance customers)

These instructions are for CyBlock Appliance customers that are evaluating or purchasing CyBlock Appliance and want to use Cyfin for remote logging and reporting.

The serial number and activation key that were included with your CyBlock Appliance need to be entered in the Cyfin interface. Please see the product manual for further setup instructions. The product manual is located on our Web site at Support – CyBlock Appliance – Documentation and in your product:

  • For CyBlock versions 9.0.5 and later: Go to Help – User Guide.
  • For CyBlock versions 6.8.3a and earlier: Go to Help – Documentation.
  1. Download Cyfin from our Web site.
  2. Double-click the executable file and simply follow the wizard’s onscreen instructions.
  3. Log on to the product using the following default credentials:
    • Logon – admin
    • Password – password
      For CyBlock versions 9.0.5 and later: You will be required to change your password. After changing your temporary password, log on with your new password.
  4. When you log on to Cyfin, you will see a message that Download Settings need to be confirmed and/or that there is no URL List. Before doing anything else, you must first download the URL List.
  5. To download the list:
    • For CyBlock versions 9.0.5 and later: Go to Categorization – URL List – Download and select Manual.
    • For CyBlock versions 6.8.3a and earlier: Go to Administration – URL List and click the Manual link.
  6. Next, click on the Download Now button. You should see a progress meter screen pop up. When it indicates that the download is complete, you can close the window.
  7. You now need to enter your serial number and activation key.
    • For CyBlock versions 9.0.5 and later: Go to Settings – License.
    • For CyBlock versions 6.8.3a and earlier: Go to Setup – License.
  8. You may enter the Organization Name and Server Alias Name. These are optional.
  9. Enter the Serial Number and Activation Key that were included with your appliance.
  10. Click Submit to save your changes.
  11. Please see the product manual for further setup instructions.

For additional assistance, please contact Technical Support at (321) 953-5351, Ext. 4 or support@wavecrest.net.

Activating CyBlock Appliance and Cyfin

These instructions are for CyBlock Appliance customers that are renewing CyBlock Appliance or purchasing after evaluation.

The serial number and activation key need to be entered in both the CyBlock Appliance and Cyfin interfaces. Please see the product manual for further setup instructions. The product manual is located on our Web site at Support – CyBlock Appliance – Documentation and in your product:

  • For CyBlock/Cyfin 9.0.5 and later: Go to Help – User Guide.
  • For CyBlock 6.8.3a/Cyfin 8.8.3a and earlier: Go to Help – Documentation.
  1. Log on to CyBlock Appliance.
  2. Go to the License Information screen.
    • For CyBlock/Cyfin 9.0.5 and later: Go to Settings – License.
    • For CyBlock 6.8.3a/Cyfin 8.8.3a and earlier: Go to Setup – License.
  3. You may enter the Organization Name and Server Alias Name. These are optional.
  4. Enter the Serial Number and Activation Key that were included with your appliance.
  5. Click Submit to save your changes.
  6. Repeat the above steps in Cyfin.
  7. Please see the product manual for further setup instructions.

For additional assistance, please contact Technical Support at (321) 953-5351, Ext. 4 or support@wavecrest.net.

Activating CyBlock Software

These instructions are for new and renewing CyBlock Software customers.

  1. For new customers: To activate CyBlock Software, you have two options to get started:
    • Log on to your CyBlock Software evaluation copy.
    • Install a new version of CyBlock Software (if you want the product located on a different server) and log on using the default logon and password listed below.
      • Logon – admin
      • Password – password
        For CyBlock versions 9.0.5 and later: You will be required to change your password. After changing your temporary password, log on with your new password.
  2. For renewing customers: Log on to CyBlock Software.
  3. Go to the License Information screen.
    • For CyBlock versions 9.0.5 and later: Go to Settings – License.
    • For CyBlock versions 6.8.3a and earlier: Go to Setup – License.
  4. In the Serial Number field, enter the number found in the CyBlock Subscription Activation Key Certificate in your e-mail.
  5. In the Activation Key field, enter the Activation Key also found in the Certificate.
  6. Click the Submit button to save the changes.

Customizing your blocking message in the new CyBlock UI

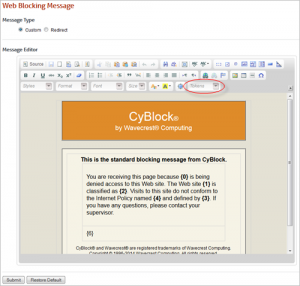
You can now easily customize your blocking message using a Message Editor embedded in the new interface (versions 9.0.5 and later). Previously, your HTML file would have to be modified outside the product (CyBlock Software), or you used the default blocking message (CyBlock Appliance).

You can use the Toolbar buttons in the Message Editor to change the formatting of the text and to add the necessary tokens in the blocking message. Or, you can enter a URL that the user will be redirected to when he or she tries to access a blocked site.

  1. Go to Web Management – Filter – Message.

blockingmessagetokens

  1. Select Custom or Redirect to configure your blocking message.
  2. If you selected Custom, the Wavecrest default blocking message is displayed in the Message Editor. Customize the blocking message to suit your needs using the Toolbar buttons to change formatting and the Tokens drop down to add the necessary tokens in the blocking message.
  3. If you selected Redirect, type the URL for the blocking message in the Redirect To field. The URL must include the protocol such as http://.

BlockingMessageRedirect

  1. Click Submit to apply your settings.
  2. If for some reason you need to revert to the Wavecrest default blocking message, click Restore Default.

For additional assistance, please contact Technical Support at (321) 953-5351, Ext. 4 or support@wavecrest.net.

User IDs are automatically added to Groups and IDs

If users are directed through the proxy before their credentials have been added to Groups and IDs (either within the product or via an Active Directory import), the IDs are added to Ungrouped IDs.

To ensure proper grouping and filter credentials, perform an AD import prior to configuring user proxy settings:

For version 9.1.0 and later:

  1. Go to User Management – Import Users – Manage and ensure users are managed Outside the Product.
  2. Go to User Management – Import Users – Active Directory – Setup.
    • Follow the steps to connect to Active Directory.
  3. Go to Active Directory – Import to manually import users from AD, and to set up an automatic sync with AD.


For version 6.8.3a/8.8.3a and earlier:

  1. Go to Advanced Settings – Groups and IDs – Import – Setup and ensure users are set to be managed Outside the Product.
  2. Go to Advanced Settings – Groups and IDs – Import – Active Directory – Setup.
    • Follow the steps to connect to Active Directory.
  3. Go to Advanced Settings – Groups and IDs – Import –

    • Manual – to manually import users from AD.
    • Schedule – to schedule an automatic sync with AD.


IDs can be manually configured within the product by navigating to the following pages:

  • For version 9.1.0 and later: User Management – Edit Users – Add
  • For version 6.8.3a and earlier: Advanced Settings – Groups and IDs – Edit – Add

Changing the proxy server communication port

In CyBlock, the default proxy communication port is 8080. You can change this by editing the cbs.cfg file.

  1. Stop the CyBlock service.
  2. Open …/Wavecrest/CyBlock/wc/cyblock/db/cbs.cfg.
  3. Look for the following line:
    • SAP_COMMUNICATION_PORT=8080
  4. Change 8080 to the desired port.
  5. Restart the CyBlock service.


Preventing a sync from occurring with CyBlock Client

You can prevent certain installations of CyBlock Client from receiving any synced data. This is done through a registry edit on the client machine.

  1. Go to “HKEY_LOCAL_MACHINE\SOFTWARE\Wow6432Node\Wavecrest\LayeredServiceProvider” in regedit.
  2. Click the name of “AnnounceStatus.”
  3. Set “value data” to hex value of “0” = no sync for CyBlock client.

To reverse this:

Set “value data” to hex value of “10” = sync is allowed for client.

Configuring Windows Server 2012 and Windows Server 2008 R2

Configuring Windows Server 2012 and 2008 R2 to push out a group policy to all users can be challenging with Microsoft’s introduction of Group Policy Preferences. These preferences provide more than 20 Group Policy extensions that increase the number of configurable settings in a Group Policy object (GPO). Within most preference items, the configuration interface looks similar to the applicable user interface for configuring settings so the layout will be familiar. The guidelines to set up users’ browsers with a proxy configuration are alike for Internet Explorer 7, 8, 9, and 10, and the following instructions are for Internet Explorer 10.

  1. Go to Group Policy Management, and select the GPO to which you want to add the Internet Explorer 10 settings.
  2. Edit the GPO.
  3. In the Group Policy Management Editor, go to User Configuration, Preferences, Control Panel Settings, and then Internet Settings. If you have already created settings for Internet Explorer 7, 8, and 9, they will be displayed here.
  4. Right-click in the right-hand pane, select “New,” and then select “Internet Explorer 10.”
  5. In the New Internet Explorer 10 Properties dialog box, click the Connections tab, and then click LAN Settings.
  6. Under Proxy server, select the check box to enable the “Use a proxy server…” option.
  7. In the Address field, enter the IP address of your proxy server, and in the Port field, enter the port number.
  8. Now you need to enable the settings and apply them to all users. You can individually enable and disable underlined settings or settings preceded by a circle within a preference item. The underlining or circle of the setting indicates whether it is currently enabled or disabled.
    • A setting with a solid green underline or a green circle is enabled. The preference extension applies this setting’s value to the user or computer.
    • A setting with a dashed red underline or red circle with a slash is disabled. The preference extension does not apply this setting’s value to the user or computer.
  9. Press the following function keys to enable or disable the settings within a preference item. To select a setting, click the actual text of the setting or its text field.

    • F5 – Enable all settings on the current tab.
    • F6 – Enable the currently selected setting.
    • F7 – Disable the currently selected setting.
    • F8 – Disable all settings on the current tab.
  10. After enabling the settings, select the check box to enable the “Bypass proxy server…” option.
  11. Click OK, Apply, and then OK to save the changes. You will see the Internet Settings entry for Internet Explorer 10 along with Internet Explorer 7, 8, and 9, if they were previously created.

Configuring proxy settings in IE 10 and 11 with registry settings

For IE 10 and 11, the alternative way of configuring proxy settings is deploying the registry keys directly.

Key path/location for the registry keys: HKEY_CURRENT_USER\Software\Microsoft\Windows\CurrentVersion\Internet Settings

  • Automatically detect settings

Registry key: “AutoDetect”
Value Type: REG_DWORD
Value Data:
0 = Disable
1 = Enable

The key AutoDetect is only visible before you start IE 10 (or IE 11) on the machine, as IE will interpret it immediately and then delete the key right after.

  • Use automatic configuration script

Registry Key: “AutoConfigURL
Value Type: REG_SZ
Value Data: “http://<servername|host>/my_proxy.pac”

  • Proxy server

To configure this, you may need up to 3 registry keys:

ProxyEnable” check box for “Use a proxy server for your LAN (these settings will not apply to dial-up or VPN connection)
Value Type: REG_DWORD
Value Data:
0 = Disable
1 = Enable

ProxyServer
Value Type: REG_SZ
Value Data: “ProxyServerName:Port”

ProxyOverride
Value Type: REG_SZ
Value Data: “list_of_exclusion”

Value Data: “list_of_exclusion;<local>”
<local> value represents the check: “Bypass proxy server for local addresses
The value is added automatically when enabling the check box in the GPP User Interface (UI) when deploying through the registry key is required.

Deploying the registry keys via GPP registry item

There are different ways to deploy the registry keys, and it is important to correctly deploy the registry keys provided above.

Location of the policy: User Configuration / Preferences / Windows Settings / Registry / Right Click + New + Registry Item

REGISTRY AND SETTING CONFIGURATIONS
  • Automatically detect settings

Action: Replace

Hive: HKEY_CURRENT_USER

Key Path: Software\Microsoft\Windows\CurrentVersion\Internet Settings

Value Name: “AutoDetect”

Value Type: “REG_DWORD”

Value Data: “0” or “1”

0 = Disable

1 = Enable

  • Use automatic configuration script

Action: Replace

Hive: HKEY_CURRENT_USER

Key Path: Software\Microsoft\Windows\CurrentVersion\Internet Settings

Value Name: “AutoConfigURL”

Value Type: “REG_SZ”

Value Data: “http://<servername>/my_proxy.pac”

  • Use a proxy server for your LAN (These settings will not apply to dial-up for VPN connections)

Action : Replace

Hive: HKEY_CURRENT_USER

Key Path: Software\Microsoft\Windows\CurrentVersion\Internet Settings

Value Name: “ProxyEnable”

Value Type: “REG_DWORD”

Value Data: “0” or “1”

0 = Disable

1 = Enable

  • Proxy Server : ProxyServerName:Port

Action: Replace

Hive: HKEY_CURRENT_USER

Key Path: Software\Microsoft\Windows\CurrentVersion\Internet Settings

Value Name: “ProxyServer”

Value Type: REG_SZ

Value Data: “ProxyServerName:Port”

  • ProxyOverride

Action: Replace

Hive: HKEY_CURRENT_USER

Key Path: Software\Microsoft\Windows\CurrentVersion\Internet Settings

Value Name: “ProxyOverride”

Value Type: “REG_SZ”

Value Data: “192.168.1.*;*.domain.com;<local>”

  • Bypass proxy Server for local addresses

The option is represented by the entry “<local>” added in ProxyOverride setting value data.

See https://blogs.msdn.microsoft.com/askie/2015/10/12/how-to-configure-proxy-settings-for-ie10-and-ie11-as-iem-is-not-available/, Case 2, Step 2 for more information.