Skip to content Skip to main navigation Skip to footer

Tag: log file configuration

What are the log file fields needed by Cyfin?

Cyfin needs certain log file fields to process your logs. The following log file fields are required:

  • Date/Time
  • URL – If the file contains the protocol, domain/host name, and path separately, the URL can be created from these fields.
  • IP Address

In addition, the following optional fields are optimal for more detailed reporting:

  • User
  • Size/Bytes
  • Reason/Status

If you have any questions, please contact Technical Support at (321) 953-5351, Ext. 4 or support@wavecrest.net.

Configuring Sophos UTM for Cyfin syslog

In order for Cyfin to analyze the Sophos UTM firewall data, you must perform the following steps to produce the proper syslog data:

  1. Set up the Web filtering option.
    • To set up the Web filtering functionality on the Web server, go to Web Protection – Web Filtering – Global and click the enable button.
  2. Syslog settings are configured in WebAdmin on the Logging & Reporting – Log Settings – Remote Syslog Server tab.
    • On this tab, multiple target syslog servers may be added, and logs may be sent to any TCP or UDP port. (Most systems will default to UDP port 514.)
    • If syslog messages cannot be delivered, they will be buffered and re-sent when possible.
    • By default, up to 1000 logs will be buffered. This feature is most reliable when using TCP as it will detect when message deliveries fail more accurately.
    • When using UDP, a failure will only be detected if the target IP is online and able to respond with an ICMP (Internet Control Message Protocol) service unavailable message.
  3. Once syslog targets have been configured, the logs to send via syslog must also be selected on the same screen. By default, none are selected. Select the Web Filter log file type, and click Apply.

Now you can proceed to configure Cyfin to receive these syslog data records.

Additional Resources:

Selecting WatchGuard log file configurations in Cyfin

Syslog Configuration

In Cyfin, the following WatchGuard syslog log file configurations are available:

  • WatchGuard Syslog
  • WatchGuard Syslog (HTTP)
  • WatchGuard Syslog (HTTPS – Bytes)
  • WatchGuard Syslog (HTTPS)

WatchGuard supports byte information for HTTP as well as HTTPS traffic. To assist you in selecting the appropriate syslog log file configuration, determine what you need from the following:

  • For all Web traffic with no byte information, configure WatchGuard Syslog.
  • For a complete picture of your Web traffic, configure WatchGuard Syslog (HTTP), WatchGuard Syslog (HTTPS – Bytes), and WatchGuard Syslog (HTTPS).

Cyfin can be set to receive syslog data from your different WatchGuard devices. Each different device would have its own log file configuration.

Cyfin Syslog Server listens for syslog messages from your WatchGuard device. Both UDP-based and TCP-based messages are supported.

  1. Select the WatchGuard Syslog log file configuration in Cyfin for your WatchGuard device.
  2. Specify the Directory in which the log files will be created. The default directory is [InstallPath]\wc\cf\log. NOTE:  For WatchGuard Syslog (HTTPS – Bytes), and WatchGuard Syslog (HTTPS), this is all that is needed.
  3. For WatchGuard Syslog and WatchGuard Syslog (HTTP), select Enable Syslog Server.
  4. For Port Type, select UDP or TCP for the Internet protocol you want to use.
  5. In the Listening Port field, the default port number is 1455. The listening port will be used by your WatchGuard device to transfer the data. You may change this number if necessary.
  6. At your WatchGuard device, specify the IP address of the Cyfin server and the listening port, and submit the syslog messages.
  7. Your log files will be created and displayed in the Log File Viewer in Cyfin.
  8. If you have many of the same WatchGuard devices, use one log file configuration with one listening port, and point each WatchGuard device to the same listening port.

Database Configuration

The WatchGuard PostgreSQL database configuration is also available.

We recommend that you install Cyfin on the same box with the WatchGuard Log Server (PostgreSQL) for easier configuration and speed. Your PostgreSQL database should also be an external database in order for Cyfin to read the log files. Note that Cyfin cannot read data from a database configured in WatchGuard Dimension.

Before trying to connect Cyfin to your WatchGuard Log Server, make sure you have selected to Send logs to WSM Server on the WatchGuard Logging page.

You will need the following information to connect Cyfin to the WatchGuard Log Server PostgreSQL logs:

  • Server Name
  • Database
  • Port
  • User Name
  • Password

Forwarding Palo Alto Logs to Cyfin Syslog Server

The following steps are required to forward Palo Alto logs to Cyfin Syslog Server:

  • Create a syslog server profile.
  • Configure a log forwarding profile to select the logs to be forwarded to Cyfin Syslog Server.
  • Assign the log forwarding profile to security rules.

The logs that must be forwarded are the Threat logs with Informational severity. Informational Threat logs include URL Filtering, Data Filtering, and WildFire logs.

Syslog Server Profile

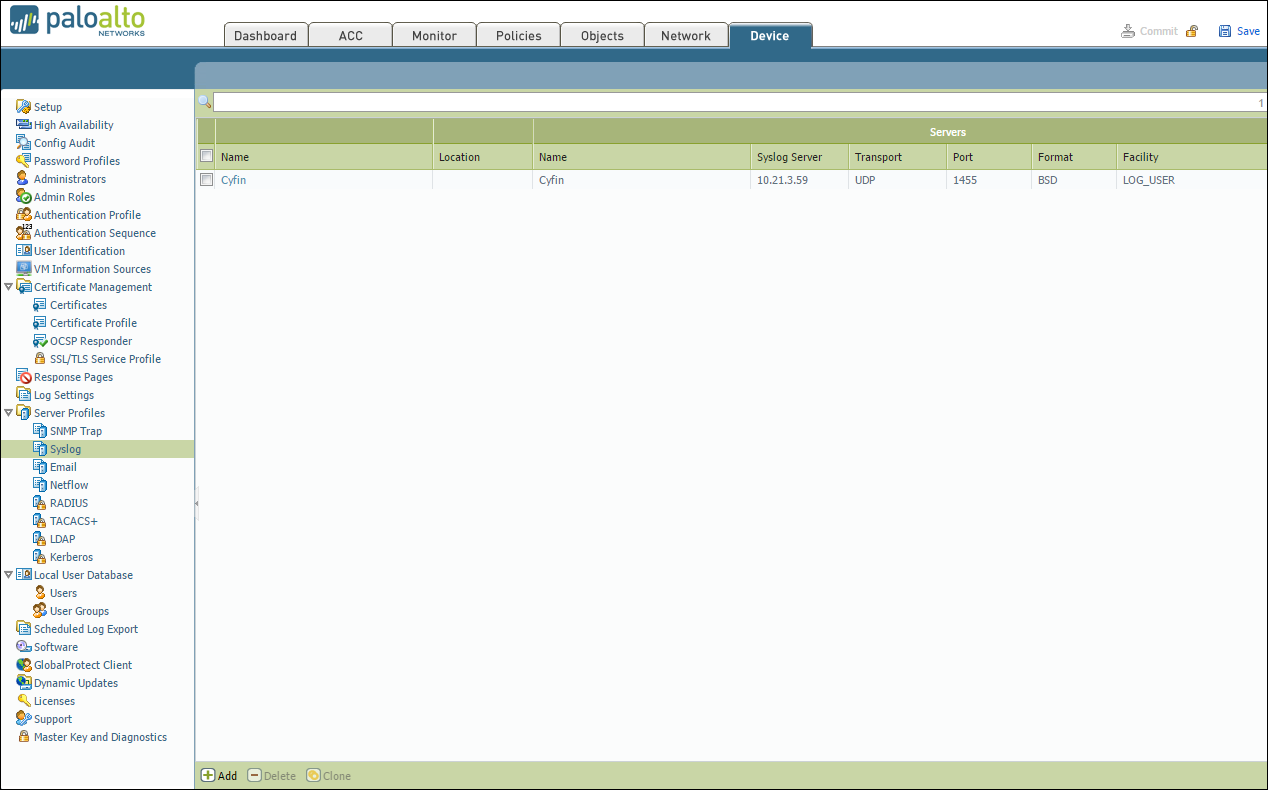
  1. In your Palo Alto Firewall user interface, go to Device – Server Profiles – Syslog.
  2. Click Add at the bottom of the screen.
  3. Enter the following information:
    • Name – Cyfin
    • Syslog Server – IP address of where Cyfin is installed
    • Transport – UDP
    • Port – 1455
    • Format – BSD
    • Facility – LOG_USER
  4. Click OK to save the server profile.
  5. Click Commit at the top of the screen to commit the change.

serverprofilesmall

Log Forwarding Profile

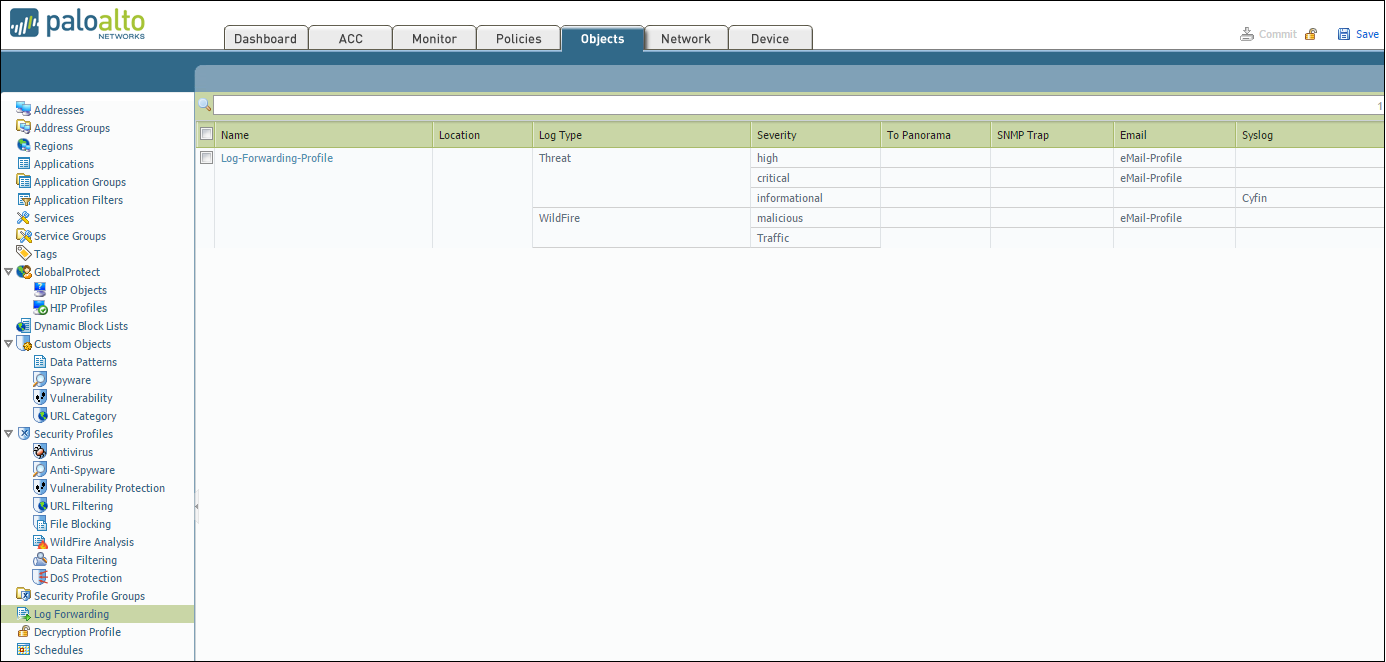
    1. Go to Objects > Log Forwarding.
    2. Click Add to create a new log forwarding profile.
    3. Enter a Name to identify the profile.

    To forward each log type (Threat, URL, and Traffic), complete the following:

    Step 1: Configure Log Types

    1. Select the Log Type from the list:
      • For Threat logs, select severity Informational in the Filter drop-down menu.
      • For URL logs, select severity Informational in the Filter drop-down menu.
      • For Traffic logs, leave the Filter setting at All Logs.

    Step 2: Configure Syslog Server

    1. Under Syslog, click Add.
    2. Select the Syslog Server Profile created in the previous steps (e.g., Cyfin).
    3. Repeat steps 1 and 2 for each log type (Threat, URL, and Traffic) you want to forward.
    4. Click OK to save the profile.
    5. Click Commit at the top of the screen to save and apply the changes.

LogForwardingProfiles

URL Filtering Profile

To log the traffic from URL Filtering logs, you may need to adjust the Site Access for each allowed URL category.

  1. Go to Objects – URL Filtering – URL Filtering Profile.
  2. Select Categories – Site Access.
  3. Filter by “Allow.”
  4. Change “Allow” to “Alert” for each category listed.

Security Policy Rule

  1. Go to Policies – Security.
  2. Select the rule for which the log forwarding needs to be applied.
  3. Apply the security profile to the rule.
  4. Go to Actions and in the Log Forwarding drop-down field, select the log forwarding profile.
  5. Click OK. By default, when Threat logs are forwarded to Cyfin Syslog Server, the logs will have several fields including source IP address, destination IP address, and URL.
  6. Click Commit at the top of the screen to commit the change.

Now, you can configure Cyfin to write the forwarded Palo Alto log files to syslogYYYYXXXX.txt files. See Cyfin Configurations Steps for more information.

Additional Resources:

Configuring SonicWall Web traffic URLs for Cyfin syslog

The following information applies to versions earlier than SonicOS 6.2.6 Content Filtering Service (CFS) release 4.0.

In order to get SonicWall Web traffic URLs into the Cyfin syslog, you must first have the SonicWall Content Filtering Service enabled. You must also enforce the Content Filtering Service within the zone (LAN) in which your traffic will be forwarded. In order to get the service enabled and enforced, follow the steps below:

  1. Log on to your SonicWall interface.
  2. Go to Security Services – Content Filter – Configure.
  3. Select the Log Access to URL box.
  4. Go to Network – Zones. Find the LAN zone and click Configure.
  5. Select the Enforce Content Filtering Service box.
  6. Apply all changes above.

To verify that the changes were made successfully, you can make a copy of the raw syslogs that are generated after the change. These files are in the write location of your Cyfin installation (default location is …Wavecrest\Cyfin\wc\cf\log). You should see files being written called syslogXXXXXXXX.txt, if you have already configured the Cyfin setup correctly.

Make a copy of the most recent file after the change, and use a text editor (Notepad++ works well) to open the file. Search for the fields dstname= and arg= to confirm that they exist. You can use Ctrl+F to find these strings. You may need to wait for a short time after making the changes for them to take effect.

Note:  If the log files are showing as invalid in Cyfin, see Unable to see Web site hits information in SonicWall for a possible resolution.

Additional Resources:

Log file setup for Check Point Syslog in Cyfin

In order to set up Check Point Syslog firewall logs in Cyfin, you must first get the CPLogToSyslog utility. Contact Check Point Support to request the hotfix that contains the utility. If you are running Check Point R77.30, the utility may not be needed. Confirm with Check Point Support. The utility gives Check Point the ability to port the syslog data from the firewall to a specified IP address and port. You will want to forward the “URL filtering” logs from Check Point to the Cyfin syslog server.

Once the CPLogToSyslog utility is installed, Check Point must be configured to have the syslog data pointed to an IP address and port. These will point to the Cyfin server’s IP address and port of choice (default port is UDP 514 for syslog). Once this part is completed in Check Point, you can then open Cyfin, go to Data Management – Log Data Source – Setup, and run through the Log Data Source Setup wizard. Select the Check Point Syslog log file type and the same port you chose in the Check Point setup.

Upon completing the Log Data Source Setup wizard, you should start to see data in the file “SyslogXXXXXXX.txt” in the log file directory that you chose in the wizard.