Skip to content Skip to main navigation Skip to footer

Tag: Firefox

Excluding Office 365 URLs from reports

If Office 365 URLs are showing in the Personal E-Mail category in reports and you want to exclude them from the reports, run a Category Audit Summary report to identify the specific Office 365 URLs. Use these URLs in one of the following ways to exclude them from reports.

Add URLs to a custom category

  • Go to Categorization – Customize – URLs to create a custom category.
  • Add the Office 365 URLs to be excluded to the custom category and submit your change.
  • Go to Categorization – Customize – Categories and set the custom category to “Off.”
  • Submit your change. The URLs should no longer appear on reports for new log files.

Note:  Imported data is not affected, that is, the URLs will still show from previously imported data. You may delete and reimport the data to exclude these URLs.


Add URLs to PAC file exceptions (CyBlock)

  • Go to Settings – Proxy – PAC File.
  • Under IP/Domain Exceptions, add the Office 365 URLs that you want to exclude from going through the proxy.
  • The URLs will be excluded from Web traffic and hence, not appear on reports.


Add URLs to browser exceptions

  • Internet Explorer
    • Go to Tools – Internet options – Connections – LAN settings.
    • If Internet Explorer is configured to go through the proxy, the Use a proxy server for your LAN check box may already be selected.
    • Click Advanced.
    • In the Exceptions box, enter the URLs to exclude.
  • Chrome (uses system settings by default)
    • At the top-right of the browser, click the Customize and control Google Chrome icon and select Settings.
    • At the bottom, click Show advanced settings…
    • Scroll down to Network and click Change proxy settings…
    • Click LAN settings and follow the instructions for Internet Explorer above.
  • Firefox
    • At the top-right of the browser, click the Open menu icon and select Options.
    • Go to Advanced – Network – Connection and click Settings.
    • If Firefox is configured to go through the proxy, the Manual proxy configuration option may already be selected.
    • In the No Proxy for box, enter the URLs to exclude.
    • Alternately, if you already have proxy settings configured in Internet Explorer, you can select Use system proxy settings.
Managing Firefox with Active Directory GPOs

To get Group Policy support for Firefox, you can load the ADM files. FirefoxADM is a way of allowing centrally managed, locked and/or default settings in Firefox via Group Policy and Administrative Templates in Active Directory. Although Firefox does not support GPOs natively, this open source ADM file will allow automatic configuration through GPO.

Downloading the ADM files

You can download and extract the latest files, including detailed documentation, at http://sourceforge.net/projects/firefoxadm.

Turning on Group Policy

  1. On the Active Directory server, open Group Policy Management by going to Start – All Programs – Administrative Tools.
  2. Right-click the group to which you would like to add this GPO and click Create a GPO in this domain, and Link it here…

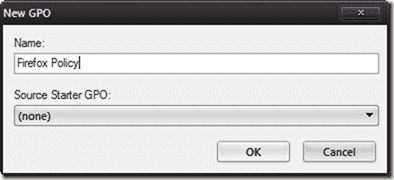
New Firefox policy

  1. Enter a descriptive name for the policy and click OK.
  2. Right-click the newly created policy and click Edit. This will open the Group Policy Management Editor.
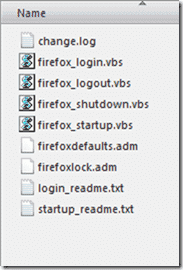
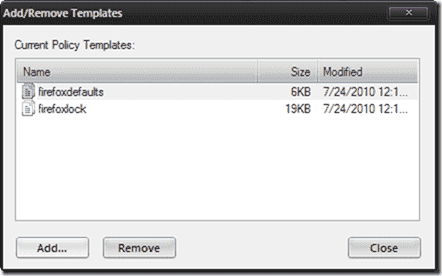
  3. Expand User Configuration – Policies and right-click Administrative Templates. Select Add/Remove Templates…, click Add… on the dialog box, and then browse to where you extracted the FirefoxADM files. You will notice that there are two ADM files–firefoxdefaults.adm and firefoxlock.adm.

firefoxdefaults.adm and firefoxlock.adm

  1. Select both of them, and click Open and then Close after the files have been imported.

Group Policy settings Firefox

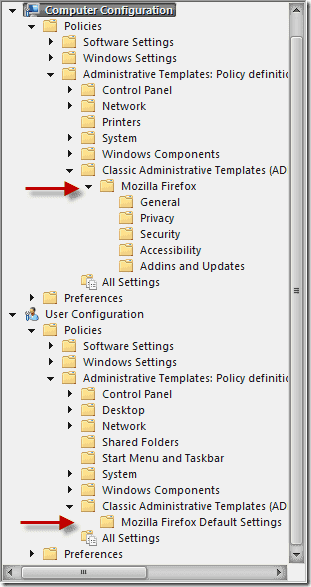
  1. Notice that the Firefox settings are under User Configuration – Policies – Administrative Templates – Classic Administrative Templates, as well as under Computer Configuration – Policies – Administrative Templates – Classic Administrative Templates, and that they are not the same.

As their locations in the tree suggest, the computer configuration will configure all defaults for Firefox on a machine in the group. The user configuration is user specific.

How FirefoxADM overcomes the lack of native support is addressed next. When you extracted the zip file, you should have noticed some extra VBS files, specifically firefox_login.vbs, firefox_logout.vbs, firefox_shutdown.vbs, and firefox_startup.vbs.

VBS files

  1. To make these configuration changes, VB scripts are used to configure Firefox during logon, logoff, startup, and shutdown. These scripts should be imported to their correct locations inside the policy.
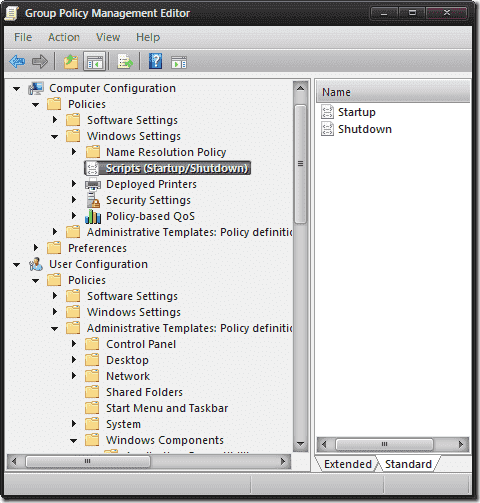
  2. In Group Policy Management Editor, navigate to Computer Configuration – Policies – Windows Settings and select Scripts (Startup/Shutdown).

Startups Scripts

  1. Double-click Startup in the right pane. A Startup Properties box will appear. Click the Add… button on the right.

Add Firefox startup script

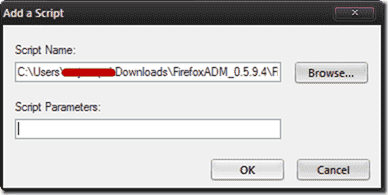
  1. An Add a Script box will appear. Click the Browse… button, locate the firefox_startup.vbs file you extracted earlier, and double-click it. Click OK to close the box.

Add a Script

  1. Click the OK button again to close the Startup Properties box. Repeat the steps above for the Shutdown script.
  2. Next, navigate to User Configuration – Policies – Windows Settings and select Scripts (Logon/Logoff). Then repeat the same steps as above pairing Logon with firefox_login.vbs and Logoff with firefox_logout.vbs.
  3. You have just configured GPO for Firefox. Now those scripts will run when the computer is started and shut down when a user logs on and logs off.

Note:  Wavecrest Computing is providing this for informational purposes only. Please use at your own discretion.

How to manually configure proxy settings in browser

Microsoft Internet Explorer

  1. Go to Tools – Internet options – Connections – LAN settings.
  2. Select Use a proxy server for your LAN.
  3. Enter the IP address of your proxy server. The default port is 8080.
  4. Clear the Automatically detect settings check box.


Google Chrome (uses system settings by default)

  1. At the top-right of the browser, click the Customize and control Google Chrome icon and select Settings.
  2. At the bottom, click Show advanced settings…
  3. Scroll down to Network and click Change proxy settings…
  4. Click LAN settings and follow the instructions for Internet Explorer above.


Mozilla Firefox

  1. At the top-right of the browser, click the Open menu icon and select Options.
  2. Go to Advanced – Network – Connection and click Settings.
  3. Select Manual proxy configuration.
  4. Enter the IP address of your proxy server. The default port is 8080.
  5. Alternately, if you already have proxy settings configured in Internet Explorer, you can select Use system proxy settings.