Skip to content Skip to main navigation Skip to footer

Filtering

How to resolve certificate-issued errors in browser

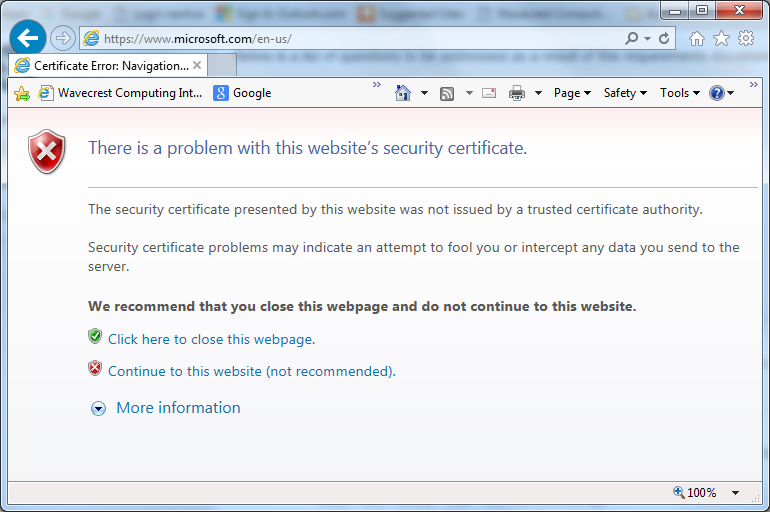
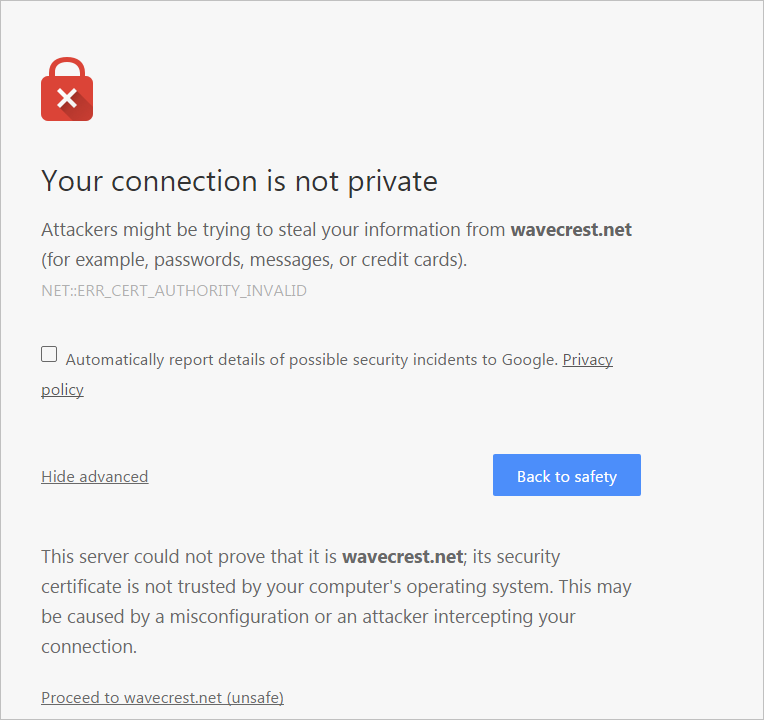
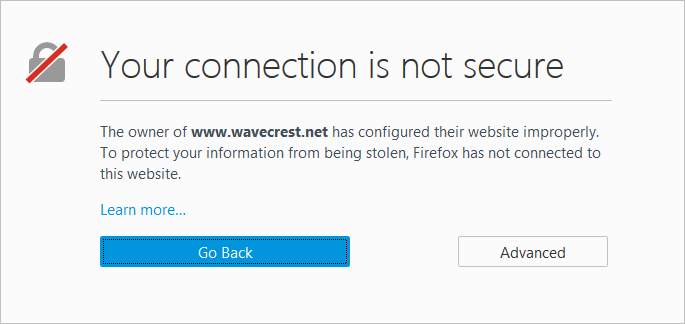
When attempting to go to a blocked secure site (HTTPS), users may experience any one of the following errors depending on the browser:

  • In Internet Explorer: There is a problem with this website’s security certificate.

CertError

  • In Chrome: Your connection is not private

CertError_Chrome

  • In Firefox: Your connection is not secure

CertError_Firefox

These are certificate-issued errors that occur if the Wavecrest certificate is not installed in the following scenarios:

  1. SSL Inspection is not enabled, and the user is attempting to go to a blocked secure site.
  2. SSL Inspection is enabled, and the user is is attempting to go to a blocked or allowed secure site.

The user does not receive the CyBlock blocking message for blocked secure sites. This is because even though a standard HTTP blocking page can still be presented to a workstation for blocked secure sites, since it is not part of the secure, encrypted HTTPS connection, the browser automatically ignores it.

To allow the blocking message to render properly for blocked secure sites or to permit users to access allowed secure sites with SSL Inspection enabled, the Wavecrest certificate needs to be installed on the CyBlock server and all client machines. More information and installation instructions can be found in the Wavecrest Certificate Installation Guide.

If you have any questions, please contact Technical Support at (321) 953-5351, Ext. 4 or support@wavecrest.net.

Blocking message displays wrong user ID

If the blocking message shows the wrong user ID and the user is on Windows 7, it is most likely a cached user ID issue.

Please check the following:

  • Open User Accounts by clicking the Start button, and selecting Control Panel and then User Accounts.
  • In the left pane, click Manage your credentials.
  • If the user has any entries under Windows Credentials, remove these stored/cached IDs.

Open a new browser, and the user should now be utilizing his normal Windows domain logon.

Filtering with allow and block lists in CyBlock

In the past, custom categories may have been used to control user’s Web activity by adding URLs to those categories to serve as white lists or black lists. This process changes the category of the URLs in custom categories and is no longer necessary with the white list/black list feature in CyBlock. The white list/black list feature allows you to create a white list as well as a black list in the same Web category policy. You may enter and save both allowed and blocked URLs in the policy without affecting the categorization of the URLs.

White lists and black lists allow you to create exceptions to your blocking policy. A white list can be used to allow access to specific sites while blocking all others in the corresponding category. A black list can be used to block access to specific sites while allowing all others in the corresponding category. For example, if you blocked the Search Engines category, but you wanted to allow access to Google, then you would type *.google.com in the Allowed URLs box to allow access to that Web site.

  1. Go to Web Management – Filter – Categories.
  2. Select the policy to which you want to add a white list and/or a black list.
  3. In the Allowed URLs box, enter the URLs you want to allow.
  4. In the Blocked URLs box, enter the URLs you want to block.
  5. Click Submit to apply your changes.

Your users’ Web traffic will now be filtered according to the URLs in your white and black lists.

If you need assistance, please contact Technical Support at (321) 953-5351, Ext. 4 or support@wavecrest.net.

Customizing your blocking message in the new CyBlock UI

You can now easily customize your blocking message using a Message Editor embedded in the new interface (versions 9.0.5 and later). Previously, your HTML file would have to be modified outside the product (CyBlock Software), or you used the default blocking message (CyBlock Appliance).

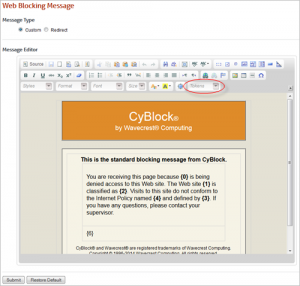
You can use the Toolbar buttons in the Message Editor to change the formatting of the text and to add the necessary tokens in the blocking message. Or, you can enter a URL that the user will be redirected to when he or she tries to access a blocked site.

  1. Go to Web Management – Filter – Message.

blockingmessagetokens

  1. Select Custom or Redirect to configure your blocking message.
  2. If you selected Custom, the Wavecrest default blocking message is displayed in the Message Editor. Customize the blocking message to suit your needs using the Toolbar buttons to change formatting and the Tokens drop down to add the necessary tokens in the blocking message.
  3. If you selected Redirect, type the URL for the blocking message in the Redirect To field. The URL must include the protocol such as http://.

BlockingMessageRedirect

  1. Click Submit to apply your settings.
  2. If for some reason you need to revert to the Wavecrest default blocking message, click Restore Default.

For additional assistance, please contact Technical Support at (321) 953-5351, Ext. 4 or support@wavecrest.net.

Filtering by IP addresses

To filter by IP addresses instead of user IDs:

  1. Go to User Management – Authentication¹ ².
  2. In the Rules tab, hover over the applicable network definition and click Edit.
  3. For Type, select Disabled.
  4. Click Edit.

Note:  The Authentication Manager allows for hybrid authentication. You can define a range of IP addresses to be authenticated by NTLM, the cookie, or not at all. To add a new rule, click the green button button.


¹ For version 9.0.5: Go to User Management – Authentication – Proxy, and set Login Names to Disable.

² For version 6.8.3a and earlier: Setup – Proxy.

Managing Firefox with Active Directory GPOs

To get Group Policy support for Firefox, you can load the ADM files. FirefoxADM is a way of allowing centrally managed, locked and/or default settings in Firefox via Group Policy and Administrative Templates in Active Directory. Although Firefox does not support GPOs natively, this open source ADM file will allow automatic configuration through GPO.

Downloading the ADM files

You can download and extract the latest files, including detailed documentation, at http://sourceforge.net/projects/firefoxadm.

Turning on Group Policy

  1. On the Active Directory server, open Group Policy Management by going to Start – All Programs – Administrative Tools.
  2. Right-click the group to which you would like to add this GPO and click Create a GPO in this domain, and Link it here…
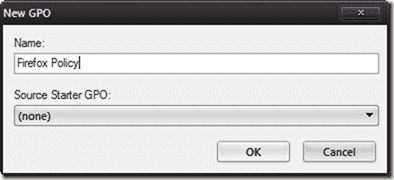
New Firefox policy

  1. Enter a descriptive name for the policy and click OK.
  2. Right-click the newly created policy and click Edit. This will open the Group Policy Management Editor.
  3. Expand User Configuration – Policies and right-click Administrative Templates. Select Add/Remove Templates…, click Add… on the dialog box, and then browse to where you extracted the FirefoxADM files. You will notice that there are two ADM files–firefoxdefaults.adm and firefoxlock.adm.
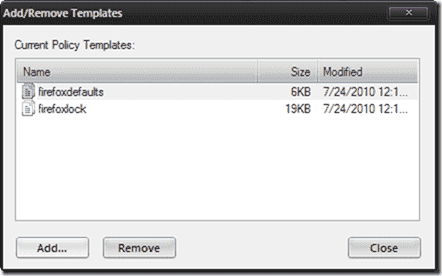
firefoxdefaults.adm and firefoxlock.adm

  1. Select both of them, and click Open and then Close after the files have been imported.
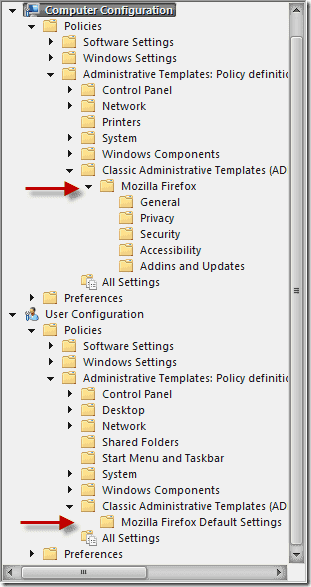
Group Policy settings Firefox

  1. Notice that the Firefox settings are under User Configuration – Policies – Administrative Templates – Classic Administrative Templates, as well as under Computer Configuration – Policies – Administrative Templates – Classic Administrative Templates, and that they are not the same.

As their locations in the tree suggest, the computer configuration will configure all defaults for Firefox on a machine in the group. The user configuration is user specific.

How FirefoxADM overcomes the lack of native support is addressed next. When you extracted the zip file, you should have noticed some extra VBS files, specifically firefox_login.vbs, firefox_logout.vbs, firefox_shutdown.vbs, and firefox_startup.vbs.
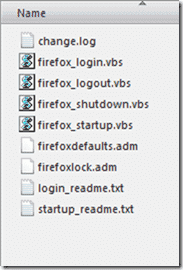
VBS files

  1. To make these configuration changes, VB scripts are used to configure Firefox during logon, logoff, startup, and shutdown. These scripts should be imported to their correct locations inside the policy.
  2. In Group Policy Management Editor, navigate to Computer Configuration – Policies – Windows Settings and select Scripts (Startup/Shutdown).
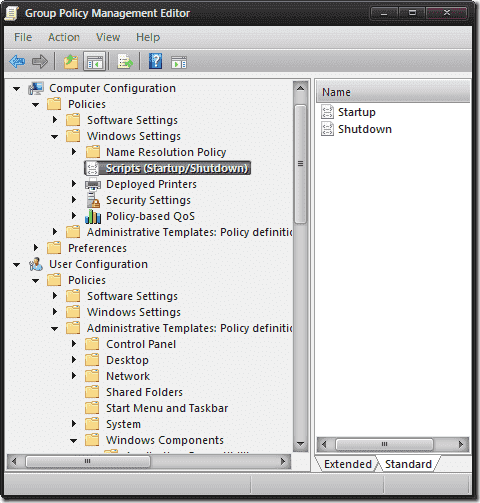
Startups Scripts

  1. Double-click Startup in the right pane. A Startup Properties box will appear. Click the Add… button on the right.

Add Firefox startup script

  1. An Add a Script box will appear. Click the Browse… button, locate the firefox_startup.vbs file you extracted earlier, and double-click it. Click OK to close the box.
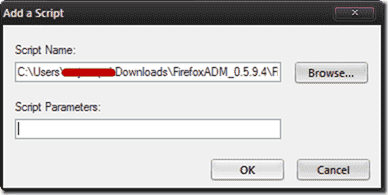
Add a Script

  1. Click the OK button again to close the Startup Properties box. Repeat the steps above for the Shutdown script.
  2. Next, navigate to User Configuration – Policies – Windows Settings and select Scripts (Logon/Logoff). Then repeat the same steps as above pairing Logon with firefox_login.vbs and Logoff with firefox_logout.vbs.
  3. You have just configured GPO for Firefox. Now those scripts will run when the computer is started and shut down when a user logs on and logs off.

Note:  Wavecrest Computing is providing this for informational purposes only. Please use at your own discretion.