Skip to content Skip to main navigation Skip to footer

Tag: syslog

v9.6.5 Release Notes for Cyfin

Enhancements

  • Health
    • Added new Health status page to display the current state of different components in the product through Health Modules. These modules can be configured to trigger notification alert emails when an error is detected. The following modules are currently available:
      • License Expiration – Checks the number of days left on the license and can trigger warning and error notifications based on days left.
      • Syslog Inactivity – Checks active syslog ports for data being sent and triggers alert when no data is received in a configurable time period. Module also checks for valid data being received instead of just any data and triggers different error alert accordingly.
  • Reporting
    • Dashboard
      • Visualizer
        • Added an extensive library of preconfigured charts for users to select when creating new panels.
  • Library
    • Updated product to use most recent MySQL library (8.0.33).

Corrections

  • Dashboard
    • Removed “AVG Daily Usage” and “AVG Daily Ingestion” tiles because metric is not useful when combined with metric data removal as it is currently. Results include large possible negative numbers. 

v9.6.4.b Release Notes for Cyfin

Enhancements

  • Visualizer
    • Added support for Microsoft defender reporting.

Corrections

    • Data Management
      • Syslog
        • Corrected issue that could cause direct syslog imports to stop working upon a service restart. The file writer continued to work, just the metric server stop receiving the data directly. This was caused by the syslog server attempting to start before the importer had been initialized.
    • Visualizer
      • Corrected aggregation on nested fields

v9.6.3 Release Notes for Cyfin

Enhancements

  • Data Managements
    • Log Data Setup
      • Added Microsoft Defender as a configuration option. This feature only available for Cyfin in VM environment.
  • Reporting
    • Dashboard
      • Visualizer
        • Added Dashboard level filters. This allows a filter to be applied to all panels with matching data source on the configured dashboard.
  • Usage statistics
    • Added periodic anonymous usage statistics gathering to improve customer experience.

Corrections

  • Data Management
    • Import
      • Disabled auto importing of syslog enabled log configurations because stream is already automatically imported.

Configure Syslog on Cisco ASA with FirePOWER Firewalls

To configure your Cisco ASA with FirePOWER  firewall to send web traffic syslog messges to your syslog server, you need to define the syslog server and apply syslog logging to your access control and SSL policies.

Define Syslog server in Cisco ASA w/FirePOWER

  1. To configure a Syslog Server for traffic events, navigate to Configuration | ASA Firepower Configuration | Policies | Actions Alerts and click the Create Alert drop-down menu and choose option Create Syslog Alert.
  2. Enter the following values for the Syslog server installed (see step 1 above).
    • Name: Specify a name to uniquely identifies your Syslog server such as ‘Kiwi Syslog Server’
    • Host: Specify the IP address/hostname of the Syslog server.
    • Port: Specify the port number your Syslog server is listening on. 514 is the default syslog server port.
    • Facility: Select any facility such as SYSLOG
    • Severity: Select Informational
    • Tag: Leave blank.

Apply Syslog to Access Control Policies

  1. Select Configuration | ASA FirePOWER Configuration | Policies | Access Control Policy.
  2. On the Rules tab, click the Edit icon next to the access control policies that apply to your network’s Internet usage. For each policy:
    1. Go to the Logging tab and select Log at Beginning and End of Connection
    2. In the Send connection events to section, check Syslog and select your syslog server (defined above)
    3. Click OK.
  3. Select the Advanced tab and click the edit icon next to General Settings.
  4. Change the Maximum URL characters to store in connection events to 4096 (this is the maximum number of characters to store for URLs) and click OK.
  5. Click Store ASA FirePOWER Changes to save your changes.

Apply Syslog to SSL Policies

  1. Select Configuration | ASA FirePOWER Configuration | Policies | SSL
  2. On the Rules tab, click the Edit icon next to the SSL policies that apply to your network’s Internet usage. For each policy:
    1. Go to the Logging tab and select Log at End of Connection
    2. In the Send connection events to section, check Syslog and select your syslog server (defined above)
    3. Click OK.
  3. Click Store ASA FirePOWER Changes to save your changes.

Cyfin Syslog server should start receiving log messages and logging them to text files.

Additional Resources

Configuring Data Sources

In Cyfin version 9.3.1, the Log Data Source Setup wizard has been redesigned to improve the configuration of the product to locate and read your Web-use data when it is syslog data, log files, or database logs. The system will analyze your data to detect the data source format and present the most suitable data types. This allows you to select the best data type from the list and ensures that you get the best match available.

You will be able to select from the following data sources: syslog, directory-based, and database.

For syslog data, select the Internet protocol you want to use, and enter the listening port number. Click Test to start collecting data. If this is successful, you will see the number of messages received incrementing. Click Stop and then Next to continue.

For directory-based or log file data, specify the directory location of your data files. You can also enter a file name with an asterisk to filter your log files, e.g., proxy*.txt. Click Test to display the number of files found. Click Next.

The Data Source Type page is displayed.
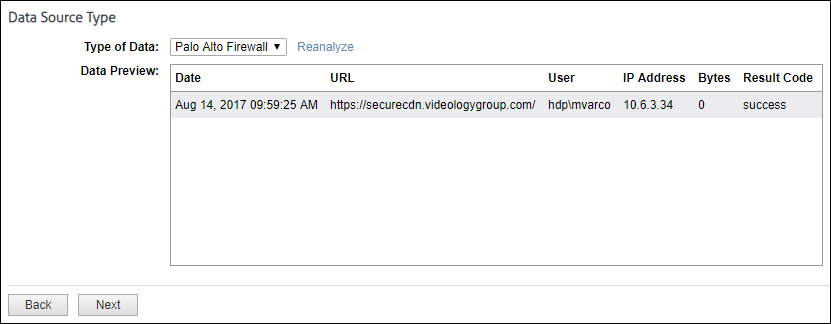
The Type of Data drop-down field will display multiple matches. As you select a data type, the data format will be shown in the Data Preview box. Look closely at the data fields to ensure that they are correct or complete.

  • You may see incomplete data, for example, if you were expecting a user name and it is missing. Click Reanalyze to see another record sample.
  • If you need to refresh the data for any reason or are still in the process of receiving syslog messages, click Reanalyze and then select the data source type again.
  • If your firewall is not in the drop-down field, but the data of another completely matches and is in the correct columns, you may select that firewall even though it has a different name. Some firewalls share common data formats.
  • If no matches are found, all syslog and directory data types will become available in the drop-down field. You can select a different data type from the field to complete the configuration process and return at a later time to change it.
  • It is easy to add new data sources to our extensive library. If you have a new data source, need assistance with multiple matches, or have no matching files, just contact Technical Support.

Also for Syslog, you can specify a location in which to keep a local copy of your data.

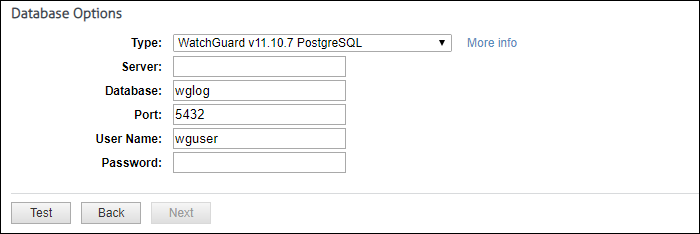
For database data, the system loads and populates the Type field with database data types. The “More info” link provides setup information on your specific database. Select the type of database and complete the remaining fields. Some fields will be populated with default values.
The last step is to give the data source configuration a name. This is helpful for identification purposes, especially if you add more data source configurations later.

If you have any questions, please contact Technical Support at (321) 953-5351, Ext. 4 or support@wavecrest.net.

Configuring Zscaler for Cyfin Syslog

Zscaler uses a virtual machine, Nanolog Streaming Service (NSS), to stream logs from the Zscaler service and deliver them to Cyfin Syslog.

To collect logs for Zscaler Web Security, perform these steps detailed in the following sections:

  1. Configure Zscaler NSS.
  2. Connect the Zscaler NSS feed to Cyfin Syslog.


Configure Zscaler NSS

NSS is maintained and distributed by Zscaler as an Open Virtual Application (OVA). To stream logs to Cyfin Syslog, follow the steps outlined in the NSS Configuration Guide at https://support.zscaler.com/hc/en-us…guration-Guide.


Connect the Zscaler NSS Feed to Cyfin Syslog

Once you have configured the Zscaler NSS, now add a feed to send logs to Cyfin Syslog using the following steps.

  1. Log into your Zscaler NSS system.
  2. Go to Administration – Settings – Nanolog Streaming Service.
  3. From the NSS Feeds tab, click Add.
  4. In the Add NSS Feed dialog:
    • Feed Name. Enter a name for your NSS feed.
    • NSS Server. Select None.
    • SIEM IP Address. Enter the Cyfin IP address.
    • Log Type. Select Web Log.
    • Feed Output Type. QRadar LEEF is the default.
    • NSS Type. NSS for Web is the default.
    • Status. Select Enabled.
    • SIEM TCP Port. Enter the Cyfin Syslog TCP port number.
    • Feed Escape Character. Leave this field blank.
    • Feed Output Format. The LEEF format is displayed.
    • User Obfuscation. Select Disabled.
    • Duplicate Logs. Disabled by default.
    • Timezone. Set to GMT by default.
  5. Click Save.

Additional Resources

Configuring Cisco Firepower logs for Cyfin Syslog

The following steps pertain to Cisco Firepower Threat Defense and are required to forward these logs to Cyfin Syslog Server:

  1. Select Devices – Platform Settings and create or edit a Firepower Threat Defense policy.
  2. Select Syslog – Syslog Server.
  3. Check the Allow user traffic to pass when TCP syslog server is down check box to allow traffic if any syslog server that is using the TCP protocol is down.
  4. Enter a size of the queue for storing syslog messages on the security appliance when syslog server is busy in the Message queue size (messages) field. The minimum is 1 message. The default is 512. Specify 0 to allow an unlimited number of messages to be queued (subject to available block memory).
  5. Click Add to add a new syslog server.
    • In the IP Address drop-down list, select a network host object that contains the IP address of the syslog server.
    • Choose the protocol (either TCP or UDP) and enter the port number for communications between the Firepower Threat Defense device and Cyfin syslog server.
    • The default ports are 514 for UDP and 1470 for TCP. Valid nondefault port values for either protocol are 1025 through 65535.
    • Check the Log messages in Cisco EMBLEM format (UDP only) check box to specify whether to log messages in Cisco EMBLEM format (available only if UDP is selected as the protocol).
    • Add the zones that contain the interfaces used to communicate with the syslog server. For interfaces not in a zone, you can type the interface name into the field below the Selected Zones/Interface list and click Add. These rules will be applied to a device only if the device includes the selected interfaces or zones.

    Note:  If the syslog server is on the network attached to the physical Management interface, you must type the name of that interface into the Interface Name field below the Selected Security Zones list and click Add. You must also configure this name (if not already configured), and an IP address, for the Diagnostic interface (edit the device from the Device Management page and select the Interfaces tab).

    • Click OK.
  1. Click Save.

You can now click Deploy and deploy the policy to assigned devices. The changes are not active until you deploy them.

Click here for more information from Cisco.

Additional Resources

Check Point Log Exporter

If you are running Check Point R77.30 or later, you must first use Check Point Log Exporter for exporting Check Point logs over syslog to Cyfin. Click here for the instructions from Check Point Support.

Important Notes

Commands should be run in an SSH session switched to Expert mode.

Installation

Ensure that the Log Exporter is installed on a log server for Check Point R77.30 and R80.10. Log Exporter is already integrated in R80.20.

Basic Deployment

In order to configure a Cyfin target for the logs, run the following on the log server:

cp_log_export add name cyfin_syslog target-server <cyfin_ip> target-port 1455 protocol udp format syslog –apply-now

where <cyfin_ip> is the IP address of your Cyfin server

Helpful Tools

  • To remove the exporter, run:

cp_log_export delete name cyfin_syslog –apply-now

  • To display the exporter’s status, run:

cp_log_export status name cyfin_syslog

  • To reset the current position and reexport all logs per the configuration, run:

cp_log_export reexport name cyfin_syslog

Troubleshooting Tips

If you do not see log files being exported:

  • Stop the exporter by running: cpstop
  • Then start the exporter by running: cpstart

If there is still an issue:

  • Edit $EXPORTERDIR/targets/cyfin_syslog/targetConfiguration.xml
  • Locate <log_files>1</log_files>
  • Change to <log_files></log_files>
  • Stop the exporter by running: cpstop
  • Then start the exporter by running: cpstart

Once this part is completed in Check Point, you can then open Cyfin, go to Data Management – Log Data Source – Setup, and run through the Log Data Source Setup wizard. Upon completing the Log Data Source Setup wizard, you should start to see data in the file “SyslogXXXXXXX.txt” in the log file directory that you chose in the wizard.

Additional Resources:

Cyfin VM syslog port

In Cyfin VM, when configuring the Cyfin Syslog Server port, the port number must be greater than 1000. Port numbers 1000 and below are blocked on the VM. Follow the steps below to change the port number if it is below 1000.

The steps below apply to version 9.3.0. However, follow the same guidelines for version 9.3.1 and later.

  1. In Cyfin VM, go to Data Management – Log Data Source – Setup.
  2. Select your existing syslog log file configuration and click Next.
  3. On the Modify confirmation screen, select the check box to indicate that you understand the statements on the screen. Click Next.
  4. On the Select Log File Type screen, your log file type is already selected. Click Next.
  5. If an Information screen appears, click Next.

  1. On the Select Log File Directory screen, change the number in the Listening Port field to one that is greater than 1000. Click Next.
  2. Click Next on the following screens to complete the validation process.

Note: Steps for v943 and older are shown in video below

Additional Resources:

Configuring log forwarding from Palo Alto Panorama to Cyfin Syslog Server

With your firewalls already forwarding logs to Panorama, the high-level steps to forward Palo Alto Panorama logs to Cyfin Syslog Server include the following:

  • Configure the server profile that defines how Panorama and Log Collectors connect to the external service, that is, Cyfin Syslog Server.
  • Assign the server profile to the log settings of Panorama and to Collector Groups.

STEP 1: Configure a server profile for Cyfin Syslog Server that will receive log information.

  1. Select Panorama – Server Profiles and select Syslog.
  2. Configure the syslog server profile.

STEP 2: Configure destinations for:

  • Logs that the Panorama management server and Log Collectors generate.
  • Firewall logs that a Panorama virtual appliance in Legacy mode collects.
  1. Select Panorama – Log Settings.
  2. Add one or more match list profiles for each log type.

The profiles specify log query filters, forwarding destinations, and automatic actions such as tagging. For each match list profile:

    1. Enter a Name to identify the profile.
    2. Select the Log Type.
    3. In the Filter drop-down field, select Filter Builder. Specify the following and then Add each query:
      • Connector logic (and/or)
      • Log Attribute
      • Operator to define inclusion or exclusion logic
      • Attribute Value for the query to match
    4. Add the server profile you configured for Cyfin Syslog Server.
    5. Click OK to save the profile.

STEP 3: Configure destinations for firewall logs that Log Collectors receive.

  1. Select Panorama – Collector Groups and edit the Collector Group that receives the firewall logs.
  2. Select Collector Log Forwarding and see step Add one or more match list profiles for each log type above.
  3. Click OK to save your changes to the Collector Group.

STEP 4: Commit and verify your configuration changes.

  1. Select Commit – Commit and Push to commit your changes to Panorama and push the changes to device groups, templates, and Collector Groups.
  2. Verify that Cyfin Syslog Server is receiving the log information in one of the following ways:
    • In the log folder, check for the syslog.txt file.
    • In Cyfin, go to Data Management – Log Data Source – Viewer to check for syslog.txt.

Additional Resources: