Skip to content Skip to main navigation Skip to footer

Tag: Office 365

Microsoft 365 Reporting Prerequisites

To use Cyfin 365 reporting you need to enable Audit Log Search and register an application in Azure AD.

Once this application is registered note the Application (client) ID and the Directory (tenant) ID. Then configure the authentication in the Certificates & Secrets section from the link provided above.

Configure Cyfin

  1. Navigate to ‘Data Management – Log Data Source – Setup’
  2. Select ‘Create New’ from the configuration dropdown and click ‘Next’
  3. Click Office365 from the listed options
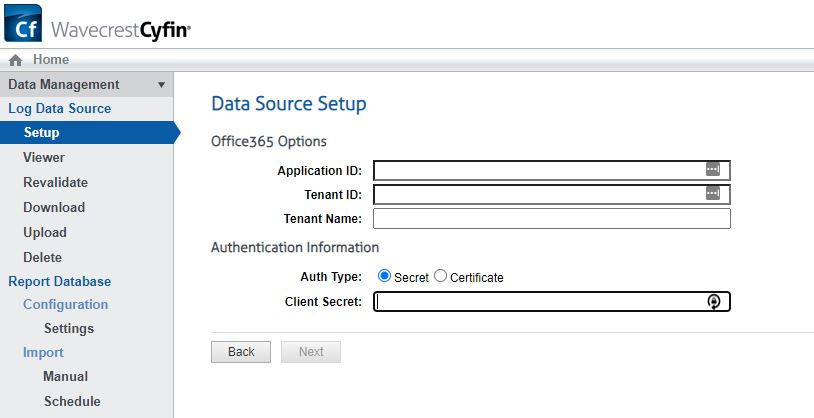
  4. Fill in the appropriate fields with information gathered from the prerequisites. See below image.
  5. Once completed continue to the next screen and name your configuration then click next once more to save.
Microsoft 365 Reporting
Microsoft 365 Cyfin Configuration

E-mailing reports with an Office 365 account

If the administrator’s e-mail address is an Office 365 account and you are experiencing an issue when e-mailing a report from Reports – Manager, Option 2 in the following article may resolve the issue:

How to set up a multifunction device or application to send email using Office 365

In the Step-by-step instructions for direct send section of the article, note the MX record POINTS TO ADDRESS value, and enter it in the Server Name field on the Settings – E-Mail screen in the product. Run the report again with the E-Mail Report Delivery option.

If you have any questions, please contact Technical Support at (321) 953-5351, Ext. 4 or support@wavecrest.net.

Excluding Office 365 URLs from reports

If Office 365 URLs are showing in the Personal E-Mail category in reports and you want to exclude them from the reports, run a Category Audit Summary report to identify the specific Office 365 URLs. Use these URLs in one of the following ways to exclude them from reports.

Add URLs to a custom category

  • Go to Categorization – Customize – URLs to create a custom category.
  • Add the Office 365 URLs to be excluded to the custom category and submit your change.
  • Go to Categorization – Customize – Categories and set the custom category to “Off.”
  • Submit your change. The URLs should no longer appear on reports for new log files.

Note:  Imported data is not affected, that is, the URLs will still show from previously imported data. You may delete and reimport the data to exclude these URLs.


Add URLs to PAC file exceptions (CyBlock)

  • Go to Settings – Proxy – PAC File.
  • Under IP/Domain Exceptions, add the Office 365 URLs that you want to exclude from going through the proxy.
  • The URLs will be excluded from Web traffic and hence, not appear on reports.


Add URLs to browser exceptions

  • Internet Explorer
    • Go to Tools – Internet options – Connections – LAN settings.
    • If Internet Explorer is configured to go through the proxy, the Use a proxy server for your LAN check box may already be selected.
    • Click Advanced.
    • In the Exceptions box, enter the URLs to exclude.
  • Chrome (uses system settings by default)
    • At the top-right of the browser, click the Customize and control Google Chrome icon and select Settings.
    • At the bottom, click Show advanced settings…
    • Scroll down to Network and click Change proxy settings…
    • Click LAN settings and follow the instructions for Internet Explorer above.
  • Firefox
    • At the top-right of the browser, click the Open menu icon and select Options.
    • Go to Advanced – Network – Connection and click Settings.
    • If Firefox is configured to go through the proxy, the Manual proxy configuration option may already be selected.
    • In the No Proxy for box, enter the URLs to exclude.
    • Alternately, if you already have proxy settings configured in Internet Explorer, you can select Use system proxy settings.

Office 365 will not activate when browsers are set to go through CyBlock

If you are attempting to activate your Office 365 products through CyBlock and are unsuccessful, please try the following steps:

  1. In your CyBlock interface, go to User Management – Authentication.
  2. Click the Bypass tab.
  3. Click the green plus icon to add a new bypass entry.
  4. Add the following two URLs to bypass authentication:

– For URL or Domain, enter *.microsoftonline.com (with asterisk). For User-Agent, enter * (asterisk).

– For URL or Domain, enter *.live.com (with asterisk). For User-Agent, enter * (asterisk).

This should now allow your products to activate properly.