Cyfin / CyBlock — E-Mail Settings FAQ
Configuring and Testing Your E-Mail Settings
Why Isn’t My E-Mail Test Working?
When setting up e-mail in Cyfin or CyBlock, the E-Mail Settings page has both a Test button and a Submit button. It may seem natural to click Test first to verify your settings — but the Test button will not work until your settings have been saved first.
You must click Submit before clicking Test.
The Correct Order
Step 1 — Fill in your e-mail settings
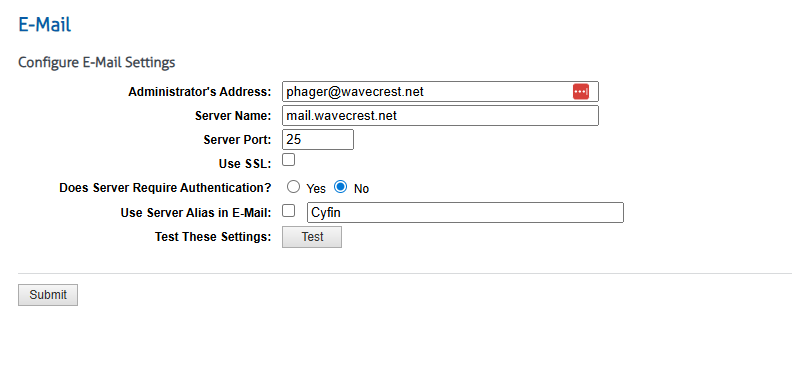
Enter your e-mail configuration on the E-Mail Settings page:
- Administrator’s Address — the address Cyfin will send reports and alerts to
- Server Name — your outgoing mail server (SMTP) hostname
- Server Port — typically 25, 465, or 587 depending on your mail server
- Use SSL — check this if your mail server requires an encrypted connection
- Does Server Require Authentication — select Yes and enter credentials if your SMTP server requires a login
- Use Server Alias in E-Mail — optionally display a friendly sender name (e.g., “Cyfin”) in outgoing messages
Step 2 — Click Submit
Click the Submit button at the bottom of the page to save your settings. You must do this first, even if you intend to test right away.
Step 3 — Click Test
Once your settings are saved, click the Test button to send a test e-mail to the Administrator’s Address. Check that inbox to confirm the message was received.
If the test e-mail does not arrive, review your settings and click Submit again before re-testing.
Quick Reference
| Button | What It Does | When to Use It |
|---|---|---|
| Submit | Saves your e-mail settings | Always first — before testing |
| Test | Sends a test e-mail using the saved settings | After Submit has been clicked |
Common Mistake
Clicking Test without clicking Submit first will either produce an error or test against the previously saved settings — not the values currently shown on screen. Always save with Submit before running a test.
For additional assistance, contact Wavecrest Technical Support.